


Knock it Out! 8-Week Challenge
Over the next 8 weeks, we’re going to move from room to room selecting one, small task to knock out. Participation is free, relatively self-directed, and your opportunity to make inroads on home decluttering and organizing.
To make it more interesting for brains that tend to get bored, we’ll mix it up. Each week we’ll be in a different room.
We’re starting small. This is not the time for a complete kitchen or garage overhaul. Avoid scope overwhelm and keep the time allocation reasonable.
The Good News
During this Challenge, take action and you’ll be a winner. No matter how tiny the gain, you’ll be further along than you were before. Not ready for the Challenge? Save this link as a guide. It will be here when it’s time.
Guidelines
This challenge is totally malleable. Make it work for you. Think of each week’s focus area as merely a guideline to help you zoom in to narrow down. Don’t forget to reward yourself for each win. Make it as extravagant or reasonable as you see fit, but do it. Rewards are enticing. They acknowledge what’s been done and often encourage us to keep going.
Q & A
You decide to take action elsewhere, but now you’re stuck. How do you begin?
Beware
This dilemma happens to nearly everyone, so please don’t freak if you bump up against it too. In order to clear and organize one area, you will need to make room somewhere else to store the things needing a redefined home. What happens then?
Since we’ll be focusing on limited areas, in most cases, there shouldn’t be a prohibitively large amount to temporarily store until you make room elsewhere. Your situation may be more cluttered or complex, that’s ok too. Do what you reasonably can.
Keep These Tips in Mind as You Go
And If It Helps...
Feel free to send me before and after photos for accountability. If you’re open to sharing with others, let me know. Your success could provide inspiration for someone else.
Get Ready, Here We Go
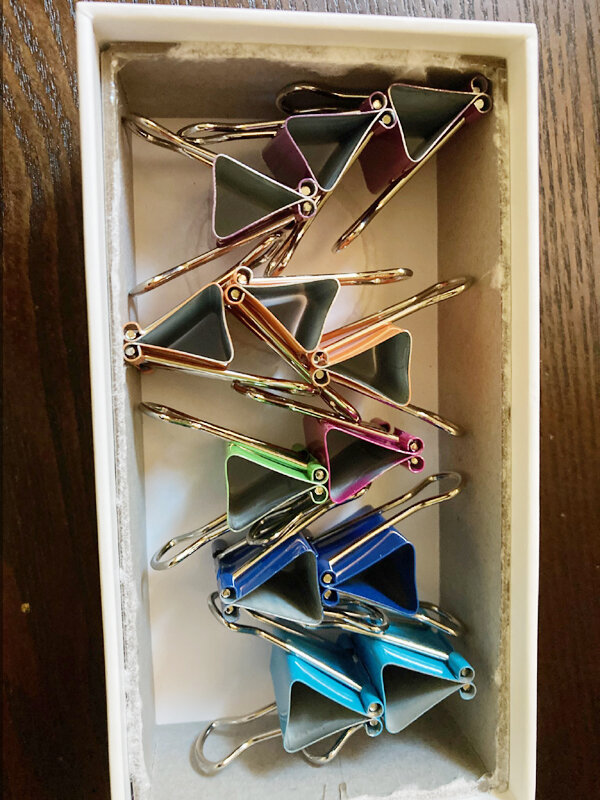
Before we launch each week, grab 4-5 boxes for sorting and transporting. Use scrap paper, binder clips, and markers to label your boxes. Labeling is super useful if you’re prone to forgetfulness or confusion. Frequent stopping to re-identify contents will slow you down and cause unwanted stress.
Let’s go.

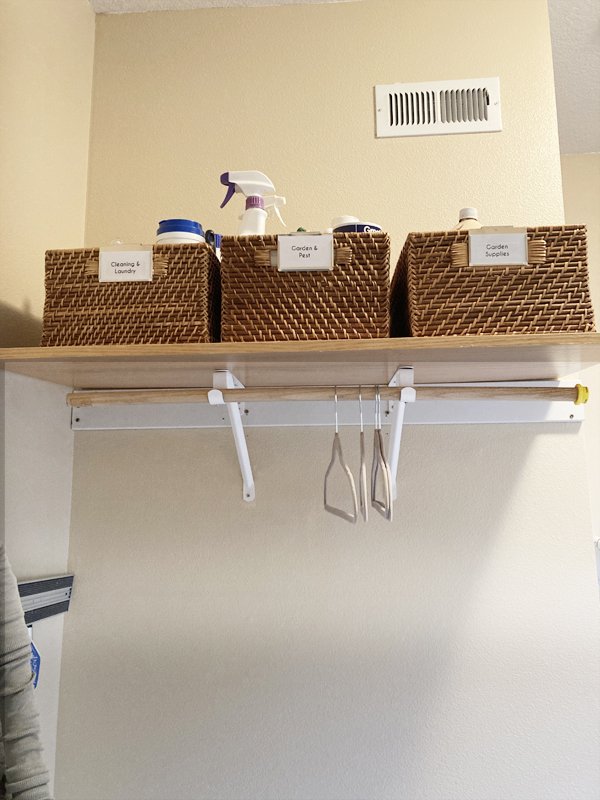
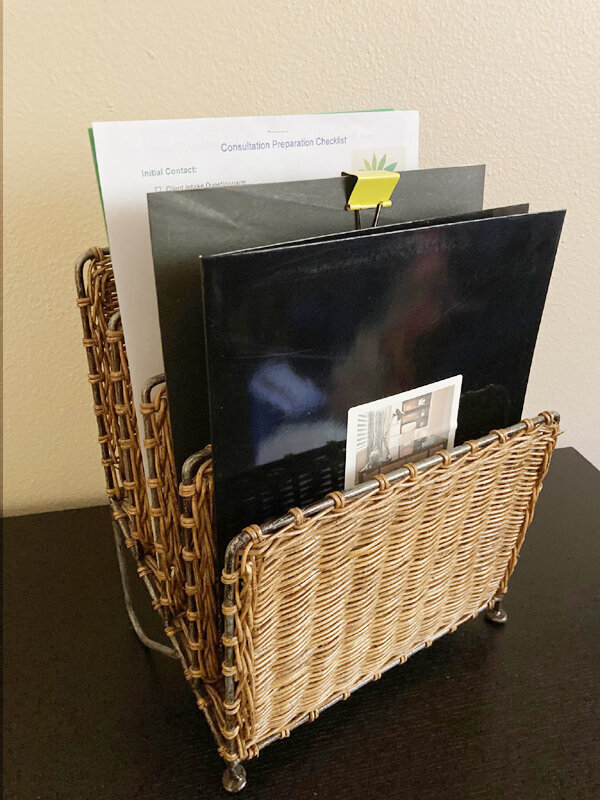
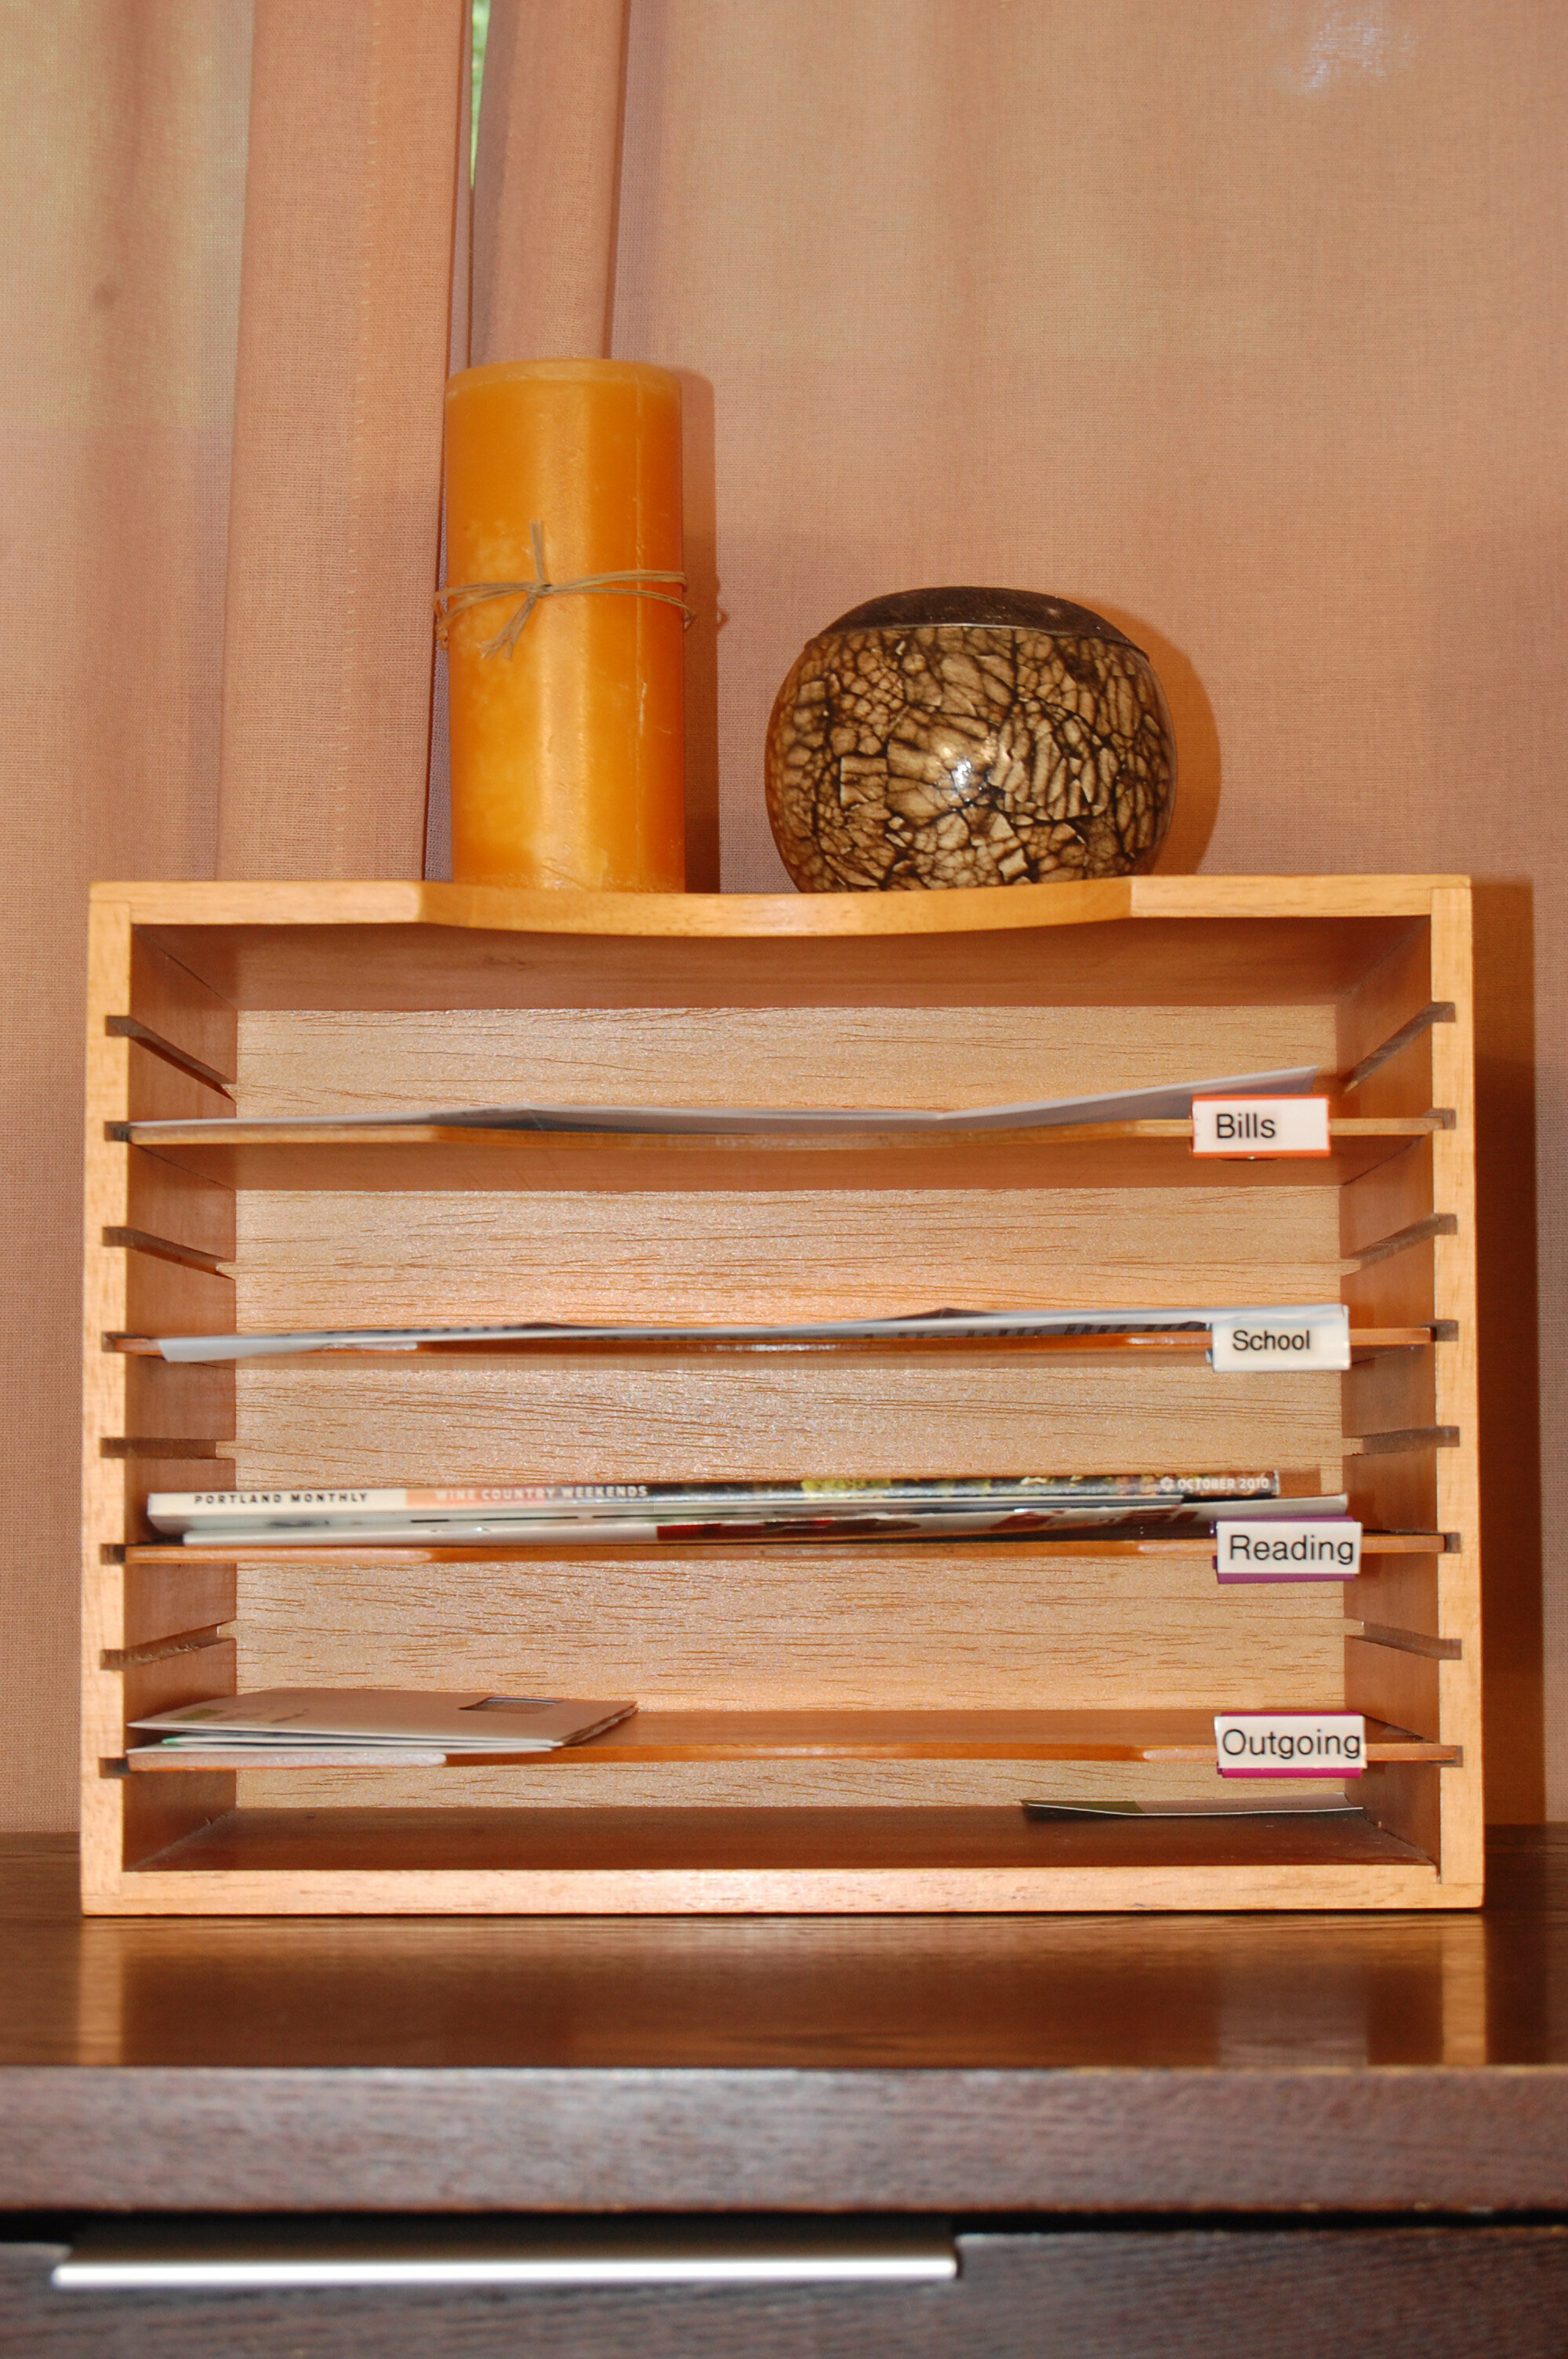
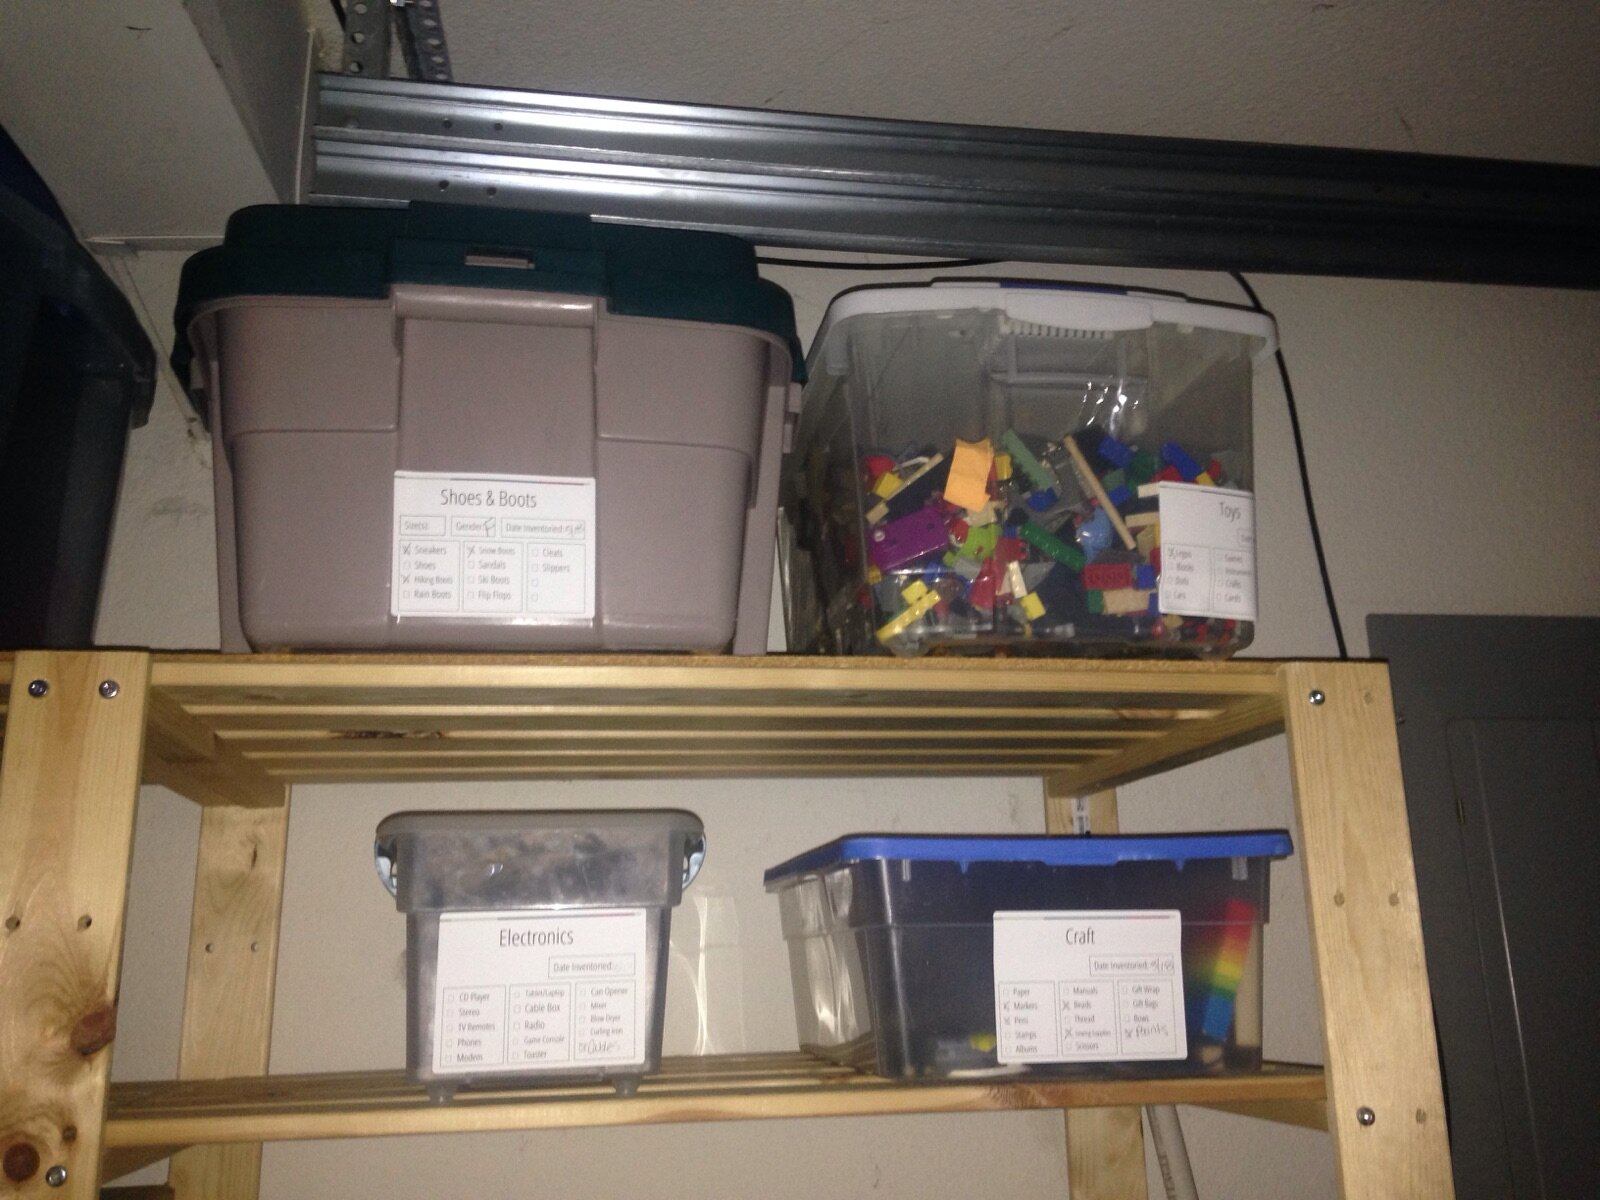
Messy, disorganized silverware and utensils
1. Select any kitchen drawer that is overfilled, disorganized, or drives you batty.
2. Empty all the contents onto the counter or a staging table. Vacuum any crumbs using a duster attachment and/or wipe down the inside of the drawer.
3. Look through the items and sort into corresponding boxes:
4. Safely set aside your boxes until you’re able to transport the items or reuse in our next week’s task.

For my small utensil drawer, I use old take-out containers to house categories. For items that are too long or wide like a rolling pin or skewers, I’ve tucked those in neatly off to the side of the drawer.
5. Categorize remaining items, those that are usable/wanted objects. Sort by usage, size, user, color, texture, whatever makes sense to you. If you have divided storage receptacles, place “like” objects together. For my small utensil drawer, I use old take-out containers to house categories. For items that are too long or wide like a rolling pin or skewers, I’ve tucked those in neatly off to the side of the drawer.

Sorted and organized silverware and utensils
6. Before returning the keepers to the drawer, consider the sensibility of that location. Does it work well for you or the primary user? Is it within easy reach for where you prep? For your dominant hand? Does it contain sharp objects that need to be out of reach of small hands? Where might be a more suitable location to rehouse them? Can you make room elsewhere? Do the items currently located in that other location make sense as is, or should they go somewhere else to make room?
Note: if step 6 makes your head spin, skip it for now. Simply put the keepers back where they were.
Next up: Bathroom vanity drawer
Stepping Back to Last Week
Welcome back to the Knock it Out! 8-Week Organizing Challenge. Did you knock it out of the park with Week 1’s kitchen drawer assignment? If so, high five. If not, that’s totally ok. Not every attempt will be a home run. It’s also not a wash-out, let’s view it as a learning experience. Where did things go sideways? What do you need to watch out for before beginning this week’s challenge for a smoother ride? Not enough boxes? Grab more before starting our next assignment. No room for temporary storage until you make room elsewhere? Find boxes that will allow you to safely stack (no higher than waist height in case they tumble).
Hopefully one drawer didn’t cause too much of a disruption, but if so, please don’t get discouraged. Step-by-step, we’ll get there. Would it help to set aside a few extra minutes or perhaps even hours to sort through your collected items and find next homes for them? Next homes might mean outside your own home. Releasing objects is hard for many people. Donating and gifting can make the shift easier to swallow. If recycling or trashing are the only options, that can be hard to swallow. Keep in mind the extra space will most likely feel good, very good. Channel the resistance or hesitations toward guiding future purchasing decisions. That’s a superb way to embody the learning. Less means so much more. More space, more money in your wallet, more ahhhhhh.
Before We Begin
You’ll notice today’s task is very similar to last week’s. I opted to stick with a drawer to build muscle memory and to hopefully move quicker now that you’re familiar with the process. If you weren’t able to join us last week, feel free to head to the kitchen when you have a chance and refer to these steps if you need guidance. Either way, before beginning you might wish to refresh your memory by reviewing the Challenge recommendations particularly if you’re prone to getting stuck or overwhelmed.
In parentheses, you’ll find suggested sorting categories.
Launch Week 2

Are you thinking that’s not too bad? Well, it could be better. Easier to find what I need faster. So here it goes.
We’ve entered week 2, and we’re heading to a room we can’t avoid…the bathroom.
If your home has more than one bathroom, select whichever one has a vanity drawer that needs attention. No vanities? Feel free to tackle a linen closet shelf or medicine cabinet shelf. Keep it simple by focusing in on one specific location at a time. Afterward, if you’re still raring to go and have time spare, keep on truckin’.
Let’s get to the bathroom. It’s an opportunity to use the facilities prior to starting. Avoid that distraction. Play music or a favorite podcast too if it helps.
1. Select any vanity drawer that is overfilled, disorganized, or drives you batty.
2. Empty all the contents onto the counter or a staging table. Vacuum any debris using a duster attachment and/or wipe down the inside of the drawer.
3. Look through the items and sort into corresponding boxes:
4. Safely set aside your boxes until you’re able to transport the items or reuse in our next week’s task.

5. Categorize remaining items, those that are usable/wanted objects. Sort by usage, size, user, color, texture, whatever makes sense to you. If you have divided storage receptacles, place “like” objects together. My top vanity drawer houses my cosmetics, toothpaste, dental floss, razor and essential oils. Originally, the contents were scattered and hard to locate quickly. I repurposed an old sorter which now neatly categorizes most of the smaller items for quick grab and go.
6. Before returning the keepers to the drawer, consider the sensibility of that location. Does it work well for you or the primary user? Is it within easy reach for where you prep? For your dominant hand? Does it contain sharp objects that need to be out of reach of small hands? Where might be a more suitable location to rehouse them? Can you make room elsewhere? Do the items currently located in that other location make sense as is, or should they go somewhere else to make room?
Note: if step 6 makes your head spin, skip it for now. Simply put the keepers back where they were.
Now go reward yourself for a job well done or at least done.
Next up: Office Desktop
Stepping Back
Two weeks of decluttering and organizing are now under your belt. Are you raring to keep going or are you pooped out? For some, organizing is a breeze. For others, not so much. So please don’t get too discouraged. Do what you can at your own pace. You’ll get there. Or at least somewhere further than where you’ve been.
Before We Begin
Gather your supplies before beginning so you don’t have to break the pace or focus. If you need a reminder how to prep, I recommend reviewing the Challenge guide. Keep in mind, these are not hard and fast rules, they are simply recommendations in case you’re stuck. Improvise if needed. Bags aren’t great for sorting, but they can work in a pinch. Labels don’t need to be fancy, they just need to serve as reminders. Be creative and resourceful. You’ve got this.
Let’s Go

With a bit of straightening, I would have more room to spread out and less distractions.
Ready for week 3’s challenge? Time to head to your home office to declutter and organize your desk surface. I use the term office and desk rather loosely as your home office may be your kitchen, bedroom, playroom or even off-site in a tool shed or communal workspace. And your desk could be a table, countertop, or your bed. Feel free to adapt each of the steps to fit your circumstances.
1. Clear out.
Clear all items off your desk surface, or at least as much as you can safely handle. Printers, external monitors, desktop computers, these may be non-negotiable. A completely clear surface is ideal for many reasons.
2. Sort.
Sort as you remove each item. Here’s a sample box labeling list (modify as necessary)…
3. Relocate.
Stage the boxes for their next destination.
4. Decision time.
Office area keepers need not necessarily return to your desk.
Paper taking up far too much real estate on your desk, command center, countertop or whatever area serves are your work or bill pay zone? What can you do with all that paper? Try these steps.
What are the best ways to organize and file the papers you wish to keep?
5. Restock.
Time to mindfully restock your desk top.
The only way for me to focus and be optimally productive is with a clear desk. See what level of spaciousness works well for you. Then modify.
Next up: Entryway closet
Stepping Back

Messy entryway closet could use some TLC
Here we are in Week #4 of our decluttering and organizing challenge. I’d lay odds that some of you have given up, that’s if you even started in the first place. But let’s get on to our next area before you run off to something more satisfying or your beeper sounds the alarm for your next appointment.
Before We Begin
Gather your supplies before beginning so you don’t have to break the pace or focus. If you need a reminder how to prep, I recommend reviewing the Challenge guide. Keep in mind, these are not hard and fast rules. They’re simply recommendations in case you’re stuck. Improvise if needed. Bags aren’t great for sorting, but they can work in a pinch. Labels don’t need to be fancy, they just need to serve as reminders. Be creative and resourceful. Remember, you’ve got this. Break it down as much as you need before you have a breakdown.
A Little Backstory
Many of my clients lament that their entryway closets, if they have one, are clutter magnets. Aside from all sorts and seasons of outerwear, there’s an assortment of accessories, purses, shoes, grocery bags, luggage, games, camping gear, toys, games, musical instruments, gift wrap supplies, massage pad, you name it. Along with many of the items mentioned, my entryway closet holds three ginormous dining room table protectors. If they’ve been used a dozen times in 30+ years, I’d be surprised. Fortunately, they’re easily stuffed along the rear wall of the closet and don’t overly consume space. But there is other crap that might be best stored elsewhere, pared down, or tolerated for lack of a better location. Namely an emergency supply kit easily accessible from the front door if the rest of the house has crumbled, heaven forbid, as a result of the long-predicted Pacific coast “Big One.”
It makes sense that the entryway closet is a catchall due to its proximity to entering the house and off-loading new purchases. It’s a helpful location for remembering gear prior to leaving the house. Embarrassment, shame, frustration are often experienced particularly when it comes to hanging up guests’ coats. That doesn’t happen due to lack of room or fear for the avalanche should you open the closet door. How dreadful if it’s your boss or someone you hope to impress (before you freak out, their closet may be in a similar state). More often than not, guest outerwear gets dumped on a bed which isn’t a bad idea. It also means ensuring that the bedroom is in a respectable state prior to the doorbell ringing; otherwise, that room becomes another sources of embarrassment, shame, and frustration.
If your residence doesn’t sport an entryway closet, no worries. Target a linen closet, bedroom closet, office closet, or other small space begging for tidying or de-bulging.
Let's Go
Don’t be surprised if you’re thinking you’ve read these steps before. The beauty of organizing is that it’s repeatable, and therefore, gets easier with practice. Keeping areas from getting into a chaotic state, now that requires a bit more behavioral adjustment. We’ll eventually get to some ideas to address that.
1. Clear out
Clear all items out of the closet or as much as makes sense to you. If you know that most, if not all, coats will remain hung there, then it’s ok to save yourself time and your back muscles by leaving them as is.
Key reminders from last week and some new ones:
2. Sort
Sort as you remove each item. Here’s a sample box labeling list (modify as necessary)…
3. Relocate
Stage the boxes for their next destination.
4. Decisions
Time to decide what gets to remain in the closet, at least temporarily until the next change of season.

Pottery Barn’s Samantha Bench is an example of a place to sit as well as maximize entryway storage.
Label bins or hook sections or possibly color code to guide users where to re-stow their gear.
5. Restock
Time to mindfully restock the closet. But before you do…

Fortunately, it took less than 10 minutes to tidy the closet. Old jackets are on the way to the donation center.
Next up: Craft shelves
Stepping Back

Gift wrap, candle making, and other craft supplies neatly stored in the closet.
We’re now more than ½ way into our 8-week challenge. Are you feeling confident in your new or reinforced skills? Have you acquired any additional organizing or decluttering knowledge? What have you noticed about yourself? Your accumulation or storage habits? If you still feel like you’re on shaky ground, that’s not unusual. We all learn at our own pace, and each area has its own set of circumstances. Much like this week’s topic.
Before We Begin
Gather your supplies before beginning so you don’t have to break the pace or focus. If you need a reminder how to prep, I recommend reviewing the Challenge guide.
Getting Crafty
Craft rooms are fun. A sacred hobby zone dedicated to unleashing your creative genius. Crafty spaces are also one of the most complicated areas to organize due to the depth, breadth, sizes and shapes of supplies. Furthermore, they get messy quickly and stay that way until the current project or segment is completed. Searches through unruly piles waste time and diverts you from the activity that brings you joy. Out of control, duplicate inventory leads to wasteful purchases, overspending, and storage nightmares.
Before you despair, the good news is the same decluttering principles we’ve used the last 4 weeks apply here too. You’ll be off and running this week in no time.
Let's Go
1. Clear out
I can sense the temptation to spend a few minutes on your current hobby project instead of this challenge. Why not? It’s definitely more fun. But the reason you’re here is that the chaos is a downer. Focus only on decluttering in lieu of working on your hobby. Otherwise you will feel rushed and discouraged. Set to work on straightening and reducing unneeded or unwanted goods while keeping in mind that in the end you’ll be able to focus with greater ease.
If it helps, strike a compromise. For every 17 minutes spent on this step, agree to allocate double that time on your craft. Use a timer to let you know when it’s time to switch.
Move things aside to create enough space for a staging area. Then grab your boxes/bins and markers for labeling your boxes or piles.
2. Start small, focus, and analyze.
Select a limited area to begin. One shelf, a drawer, a table. Score an easy win. Beware of the rabbit hole. Clearing one location will likely lead to “I need to clear space elsewhere to store these things.” Let’s stick to one step at a time. Just box and label next destination items for relo later. Don’t yet know where? Let those thoughts percolate. Give yourself a electronic calendar deadline for getting to relo items so the boxes don’t languish interminably. (When you grab your phone to add it to your calendar, avoid surfing or checking emails!!). On deadline day just do it. Sort, subdivide, transport, and arrange. Be willing to be flexible. If it’s not quite right, rearrange until it feels suitable.
Analyze what is working and what isn’t regarding storage, flow, and aesthetics. If some areas are fine, then perhaps leave well enough alone. Focus on the areas that drive you crazy or prevent you from accomplishing your project goals efficiently.
If you run out of time, return whenever you have a chunk of spare time, repeat this process. Set alerts if you’re prone to hyper-focus so that you don’t lose track of time, appointments, or other obligations.
3. Sort Keepers vs Tossers.
Have 2 boxes ready for keepers and tossers. After selecting an area, pull out or remove all the items. You’ll end up with a mess of stuff. Take some deep breaths if needed because here comes the hardest part…deciding if you’ll ever want or need what you’ve got. Using a discerning eye, consider what you’ll likely use. Rest assured, everyone goes through “what if I need it someday????” Yes, you might.
Set the highly questionable things aside for decisions later. Concentrate on the easy stuff. Let go of the cloth material, paint colors, threads, or other supplies that are poor quality, unusable like dried out paint, or not your taste. You might even have supplies left over from old hobbies or inherited from others. No guilt, just release what doesn’t serve you.
The goal is reducing extraneous clutter and expenditures. Your wallet will thank you.
Sort each item into your keeper or toss boxes (you can subdivide later, keep it simple for now). Tossing includes donating, gifting, selling. Recycling and trashing are last resort measures. Your supplies may need to go to your local Household Hazardous Waste facility. Check with your hauler for guidance. Here are some eco disposal resources for your no longer needed arts and crafts supplies. Contact the facility before you grab your keys to head out the door to verify accepted items, hours of operation, location, and other protocols.
Carefully stack those destined for disposal until you’re ready to sort them for their next destination. Anything that is clearly trash or curbside recyclable, ditch before you have second thoughts.
As the boxes fill, grab more and start a new set.
4. Arrange the keepers.
Return to your keeper box. Subdivide retained objects into those staying in the craft room or into a transport box to be bussed elsewhere. Further subdivide by craft room location, if desired.

Sort threads by color or whatever makes sense to you. Image by Bruno Germany from Pixabay
How do you arrange the items staying in the craft room? That is totally up to you. What makes the most sense for your visual and kinesthetic needs. Don’t be afraid to go with your first inclination you can always change your mind if you discover some other way is more rational. Short on space? Hang items on the back of doors such as a pull-down table or in over-the-door pocket holders. Suspend rods from the ceiling if you lack a closet. Get as creative as you safely can.
Here are some ideas to get your sorting started. The links provided are not endorsements, solely idea generators.
By hobby, if you have multiple hobbies.
By product. Craft papers, writing implements, yarns, embellishments, photos, etc. Once you have general sorting done, then you can refine the sorting within your categories such as color, theme, patterns, object size, etc.
By available storage space. Fabric bolts will likely chew up more space than small embellishments, paints, or rubber stamps.

Shop at home first for storage options
Before you head to the store or online to purchase storage options for your supplies, first shop at home. Chances are you have bins, jars or other storage options available. I use an old spice jars for housing beads, buttons, and glitter neatly in a spice rack. If you’ve got nothing suitable, economize by shopping garage sales, thrift stores, and neighborhood online marketplaces including Buy Nothing groups.
If you have the time and inclination, you can dress up storage containers to enliven your space and satisfy visual preferences. If the containers or furnishings will0 be tucked away in closets, then there is less need for fanciful objects. More time savings means more time for your hobby.
Next up: Garage Corner
Stepping Back

Pick a corner to begin this week’s tidying project.
Welcome to Week 6 of our 8-week challenge. Are you noticing any difference in your home since we began? If the changes are tucked away in drawers or behind closed doors, then out of sight is likely to be out of mind. However, whatever accomplishments you’ve achieved or have yet to achieve, I want to acknowledge your participation. Remember, each step forward, whether it’s a baby step or a giant leap, it’s further than where you began. It will also take some tending to in order for the spaces to remain tidy and useful. Now, let’s get ready for this week’s area.
Before We Begin
Here are some vital safety and comfort tips before you set to work to get you in the right frame of mind and keep you going longer.
Select a season and day when the temperatures aren’t dangerously or uncomfortably hot or cold unless you have no choice such as with a move or estate clear out. It’s also helpful to start organizing projects after waste collection days so that the disposal bins are empty.
Wear comfortable clothing. Dress for the temperatures. Eat and hydrate so you’re fully resourced with energy and stamina.
Keep water bottles, damp rags, or misters nearby if you’re working on a stifling day or space.
Use gloves, and yes, a mask to avoid inhaling too much dust or rodent droppings, and possibly goggles if the area is dangerously infested. Here are some suggestions from the Centers for Disease Control (CDC) for cleaning after rodents. Keep a plastic bag handy to put your shoes in when you’re done and possibly your clothing too if they get gross. Take them directly to the laundry room when finished for washing and shoe sanitizing.
Grab protective shoes as nails or other sharps may be on the floor and to protect your tootsies in the event objects tumble off shelves. Knee pads are advantageous for long periods of kneeling or low benches.
Back braces are also helpful if your back needs extra support.
Find furniture sliders and/or dollies to move large objects without wheels.
Gather your supplies before beginning so you don’t have to break the pace or focus. If you need a reminder how to prep, I recommend reviewing the Challenge guide. Move things aside to create enough space for a staging area. Your home might not have a garage, attic, or outdoor shed. That gives you the freedom this week to direct your efforts elsewhere or take a break.
Set up a staging area relatively close, otherwise, you’ll use up your energy running back and forth unless you’re looking to burn calories. Then grab your boxes/bins and markers for labeling your boxes or piles.
1. Start small.
When you walk into any of this week’s areas, does your heart race, pit form in your stomach, sense a crushing need to run as fast as you can? You’re not alone. By design, these spaces tend to be dumping grounds. What happens in dumping grounds? They grow, mostly untended, until the point where you or someone else in your home decides enough is enough. Admittedly, it’s no picnic.
Where do you start when you have no idea? Did you notice I used the word ‘corner.’ Pick any corner to start. Somewhere you’ve been meaning to address, somewhere that you suspect something you’ve been looking for is hiding, or a quick win so you can get the heck out of there. Build your way to the confidence to tackle more complicated or time intensive spaces.
Beware of the rabbit hole. Clearing one location will likely lead to “I need to clear space elsewhere to store these things.” Let’s stick to one step at a time. Just box and label next destination items for relo later. Don’t yet know where? Let those thoughts percolate. Give yourself an electronic calendar deadline for getting to relo items so the boxes don’t languish interminably. (When you grab your phone to add it to your calendar, avoid surfing or checking emails!!). On deadline day just do it. Sort, subdivide, transport, and arrange. Be willing to be flexible. If it’s not quite right, rearrange until it feels suitable.
Analyze what is working and what isn’t regarding storage, flow, and aesthetics. If some areas are fine, then perhaps leave well enough alone. Focus on the areas that drive you crazy or prevent you from accomplishing your project goals efficiently.
If you run out of time, return whenever you have a chunk of spare time, repeat this process. Set alerts if you’re prone to hyper-focus so that you don’t lose track of time, appointments, or other obligations.
As the boxes fill, grab more and start a new set. Safely stack (no higher than waist height) those boxes that are completely filled. Lidded, handled Banker’s boxes make toting and stacking a breeze.
2. Clean up and clear out.
By now, are you’re thinking I know what’s she’s going to say next? Yes, the process is repetitive with minor adjustments. Your perceptiveness shows learning is happening. Now, let’s do it. Get your sorting boxes ready. Empty a drawer, or remove all items from a shelf, or inside a cabinet.
Take some deep breaths if needed because here comes the hardest part…deciding if you’ll ever want or need what you’ve got. Using a discerning eye, consider what you’ll likely use. Rest assured, everyone goes through “what if I need it someday????” Yes, you might. Except for the holiday decorations, or off-seasons clothes, tools and hardware, and recreation amenities, many of the things stored in these locations have been festering since you moved in. Likely they never will never see action. Did you inherit furniture from a loved one who, sadly, will never need it again and not your taste? Someone else may benefit even if it’s from the parts and not the entire unit. Are there boxes of mildewed memorabilia? It’s tough to part with memories, unless they’re traumatic. In that case, ditch them to spare your emotions. You deserve better. If the good memories are now smelling like moldy dog towels, try airing them out. Otherwise, those moldy memories will likely lead to unhelpful health concerns. Take photos of your old photos if that makes you feel better. Preserve those somewhere less damp.
Set the highly questionable things aside for decisions later. Concentrate on the easy stuff. The goal is reducing extraneous clutter and expenditures. Your wallet will thank you.
Toss products that are no longer usable, expired, or desired. Tossing includes donating, gifting, selling unused or still usable goods. Recycling and trashing are last resort measures.
Every garage, some attics, and most sheds house Household Hazardous Waste (HHW). Label one disposal box for HHW then add old chemicals such as drain cleaners, cleaning supplies, or other types of hazardous goods. If you’re not sure if the product qualifies such as old cans of paint, glue, caulk, contact your waste hauler for disposal guidance. Latex paint cans that are empty or nearly empty are typically trash. Oil paint is HHW. If you have residual paint remaining, use this site to locate recycling locations by zipcode around the country. Many paint stores here in Oregon take old paint back. These collection sites do not accept aerosols (spray paint), leaking, unlabeled, or empty containers.
Repurpose old linens (i.e., sheets, towels, blankets). Animal shelters may accept linens for use as animal bedding, cleaning, etc. If the linens are in respectable condition, but no longer suit your taste or needs, check out human shelters for donation guidelines.
I keep old towels in my car for emergency use such as keeping the car seat cool on broiling days or to safeguard legs when wearing shorts or skirts if the car sat in the sun too long (and I forgot to protect the seat). Towels have also come in handy during picnics, wiping spilled drinks, etc. I stow old wash cloths in my travel bag and my backpack for quick refreshing along with sanitizer and hydrating mist bottle.
Many local and national organizations welcome recreation gear as donations. Bikes, camping gear, sports equipment, and toys are much in need by service organizations. You can also use local online marketplaces, garage sales, or flea markets to sell old equipment. When selling, use safety precautions such as meeting in a well-lit, neutral (not your home), busy location if meeting strangers.
Here, in the Pacific Northwest, we’re fortunate to have Tools4Troops. They distribute hand and power tools for therapeutic, home, and workplace usage. Look for non-profits in your area, local marketplaces, or other outlets for usable tools and other implements. Recycling opportunities may also exist near you if the tools are unsafe or no longer usable. Place sharps inside a box or can before disposing to prevent hauler or processor injury. Label the box as “handle with care.”
Before finishing up, sort through your toss boxes to subdivide by donation facility, gift recipient, selling, recycling, if you haven’t already. Before you grab your keys to head out the door contact destination facilities to verify accepted items, fees, hours of operation, location, and other protocols.
If you’re considering letting go of numerous antiques, furniture, camping equipment, tools and garden equipment, reach out to an estate sale company for a consult or consignment shop. Opting for consignment or donation centers with pickup services will save you time, hassles, and potentially injury. Some are free, others charge a fee so be sure to ask. The fee might be worth it if it clears your space sooner allowing you to get on with other things.
Carefully stack those boxes destined for elsewhere until you’re ready to deal with them. Anything that is clearly trash or curbside recyclable, ditch before you have second thoughts.
3. Housing the keepers

A well organized space makes it easier to see what you’re searching for and getting on to the next step. Labels are especially helpful.
What’s the best way or system to organize and arrange the keepers? That’s easy. Whatever works for you. Nothing is set in stone. It’s your home, explore, experiment, try one way. If it doesn’t work rearrange and try something different. I realize bikes, equipment, camping gear are all unwieldy to store. Ensure that anything hung, especially from the ceiling is secure. A bike fell on a friend which resulted in a concussion!
Next up: Laundry Nook
Note: Any vendor suggestions are not endorsements. The Practical Sort may or may not have necessarily purchased or tried the product. Use your discretion.
Week #7
Laundry Nook

Toss in a load of laundry to create safe passage to your machines. Image by Pixabay.com
Stepping Back
Welcome to Week 7 of our 8-week challenge. We’re so close to finishing, and I have a surprise location for you later. In the meantime, if you’ve done every room, part of each room, only one room, or haven’t quite started yet, you are where you are. Any and all accomplishments, no matter how small should be rewarded. All hesitations and apprehensions could be examined. All guilt, shame, and frustrations are welcome to go elsewhere. See ya.
Now, let’s get ready for this week’s area.
The Backstory
The laundry area may be a nook in the kitchen like in my last home or embedded in a powder room. If you live in an apartment, you may not have the luxury of in-home laundering facilities. But here’s what we all have in common…dirty clothes and presumably clean clothes. Establishing methods to keep the piles at bay and maintaining a degree of order in any dedicated laundry spaces you have will make the process go faster. Don’t believe me? Have someone hide the detergent, and see how that slows you down. Keep everything within easy reach and neatly stored to blow through the process with ease.
Before We Begin
Gather your supplies before beginning so you don’t have to break the pace or focus. If you need a reminder how to prep, I recommend reviewing the Challenge guide. Move things aside to create enough space for a staging area. Your laundry facility may be off-site, that gives you the freedom this week to direct your efforts elsewhere or take a break.
Set up a staging area relatively close, otherwise, you’ll use up your energy running back and forth unless you’re looking to burn calories. Then grab your boxes/bins and markers for labeling your boxes or piles.
1. Start small.
By design, your laundry area may be small. Too small to support the piles of dirty (or clean) laundry, but that will help you target a limited area immediately. If you’re fortunate to have a full laundry room or basement, then focus down into a specific location.
So where do you start when you have no idea? If you can’t reach your appliances, creating a pathway might be a useful place to launch. Would it be helpful to toss in a load of laundry to get there? Remove odds and ends blocking passage? That’s a logical starting point. Otherwise, choose a shelf, surface (such as the top of the washer), or a floor corner, then dig in.
Once again, beware of the rabbit hole. Clearing one location will likely lead to “I need to clear space elsewhere to store these things.” Let’s stick to one step at a time. Just box and label next destination items for relo later. Don’t yet know where? Let those thoughts percolate. Give yourself an electronic calendar deadline for getting to relo items so the boxes don’t languish interminably. (When you grab your phone to add it to your calendar, avoid surfing or checking emails!!). On deadline day just do it. Sort, subdivide, transport, and arrange. Be willing to be flexible. If it’s not quite right, rearrange until it feels suitable.
Analyze what is working and what isn’t regarding storage, flow, and aesthetics. If some areas are fine, then perhaps leave well enough alone. Focus on the areas that drive you crazy or prevent you from accomplishing your project goals efficiently.
If you run out of time, return whenever you have a chunk of spare time, repeat this process. Set alerts if you’re prone to hyper-focus so that you don’t lose track of time, appointments, or other obligations.
As the boxes fill, grab more and start a new set. Safely stack (no higher than waist height) those boxes that are completely filled. Lidded, handled Banker’s boxes make toting and stacking a breeze.
2. Clean up and clear out.
Get your sorting boxes ready.
Take some deep breaths because here comes the hardest part…deciding if you’ll ever want or need what you’ve got. Using a discerning eye, consider what you’ll likely use. Rest assured, everyone goes through “what if I need it someday????” If your laundry nook is in the basement, watch out for moldy or infested items. Handle these with care. If not salvageable, then disposal may be your only option.
In order to keep moving, set the highly questionable things aside for decisions later. Concentrate on the easy stuff. The goal is reducing extraneous clutter and expenditures. Your wallet will thank you.

Safely dispose household chemicals that are no longer usable or needed.
Toss products that are no longer usable, expired, or desired. Tossing includes donating, gifting, selling unused or still usable goods. Recycling and trashing are last resort measures.
HHW in your laundry area might consist of detergents, bleach, stain removers. Shelves might also house other household chemicals such as drain cleaners, cleaning supplies, paints, varnishes, paint remover. Safely dispose those no longer usable or needed.
Label one disposal box for HHW then add old chemicals. If you’re not sure if the product qualifies, contact your waste hauler for disposal guidance. Latex paint cans that are empty or nearly empty are typically trash. Oil paint is HHW. If you have residual paint remaining, use this site to locate recycling locations by zipcode around the country. Many paint stores here in Oregon take old paint back. These collection sites do not accept aerosols (spray paint), leaking, unlabeled, or empty containers.
Donate unused or partially used detergents and cleaning supplies to a local housing shelter or other non-profit. Check their list of accepted items and other protocols before heading out.
As you toss laundry into the machines, notice the condition of the textiles. Of course, keep those that still serve you. Repurpose old linens (i.e., sheets, towels, blankets). Animal shelters may accept linens for use as animal bedding, cleaning, etc. If the linens are in respectable condition, but no longer suit your taste or needs, check out human shelters for donation guidelines.
I keep old towels in my car for emergency use such as keeping the car seat cool on broiling days or to safeguard legs when wearing shorts or skirts if the car sat in the sun too long (and I forgot to protect the seat). Towels have also come in handy during picnics, wiping spilled drinks, etc. I stow old wash cloths in my travel bag and my backpack for quick refreshing along with sanitizer and hydrating mist bottle.
Ripped, tattered, torn, stained textiles may still be accepted at local donation sites. If not, check your area for textile recycling bins or facilities.
You’re likely to come across household goods that have been festering well beyond their use-by date. Appliance parts and manuals that belonged with appliances disposed of years ago. Gifts that weren’t your taste, but guilt kept you from releasing. Memorabilia from relationships that withered or awards and trophies that recognized childhood moments of pride, but feel trivial now. It’s ok to release those bonds in order to create space for joy, usefulness, or simply room to move. Take a deep breath, thank them, do whatever your emotional needs require in order for you to move on peacefully.
Not only is there emotional strife parting with memorabilia, difficulties are compounded by limited options for eco-disposal. Don’t lose heart. Reimagine old concert t-shirts into quilts, ancient photos into a framed collage, photograph childhood artwork and save in an e-frame. The possibilities are only limited by your imagination. Trophies are tough. You can try contacting local trophy shops. If nothing else, the vendors may be able to reuse the base to make new trophies.
Here are some donation ideas for usable housewares, clothes (inc. bras, shoes, and accessories), toiletries and personal supplies, toys and sports equipment, tools and garden supplies, and electronics. Other options include neighborhood exchanges, libraries of things, online marketplaces, and national service organizations such as the Vietnam Veterans of America (VVA) that offers pick-up options to save you time and hassle.
3. Arranging the keepers

Next up: Wild Card...your choice
Week #8
Stepping Back

Where will you select as your Week 8 finale? The choice is yours. Photo modified from images by Arek Socha and ErikaWittlieb at Pixabay.com
Here we are. We made it. I’ve been on this “Knock it Out” journey too. I hope you enjoyed it or at least you’re walking away with a new skill or 2. The real win is if you’re realizing higher confidence in your organizing abilities. Maybe it’s only a smidgen, but that’s better than where you started.
This week’s Challenge area is entirely up to you. Go back to finish a space that wasn’t completed to your satisfaction. Start somewhere new that you (or someone in your home) finds irritating. Maybe you’re ready to target a location, that in the past, felt daunting. Now you have more inner and external resources available for taking it on with greater ease.
To aid in your resource toolkit, I suggest knocking out the following free assessments: Brain Type and Sensory Preference. The more you know about yourself, the easier it is to select tools suited best for you. For example, have you ever noticed that up-beat music energizes you to get things done? Then pump up the tunes. If your spinning brain is soothed by meditative instrumentals, youtube.com offers a host of long-playing, ambient selections. If you want to make tasks easier, take the results and head over to the Brain-Based Organizing tab at ThePracticalSort.com for further success guidance.
Before We Begin
Next Up: Maintaining what you started or take a well-deserved break for now.
Challenge Epilogue: “Knock it Out” Maintenance Steps
For the last 8 weeks, did you participate in part or for the entire “Knock it Out” Challenge? If so, yay. Technically we’re not finished. Sorry if you feel misled, but here’s why. You dedicated concerted time, effort, energy, patience, and in most areas of the country, sweat. Do we want all that for naught? I surely don’t. I suspect you don’t either. Now, that being said, if your residence is occupied by multiple people, maintaining clear, tidy spaces is slightly trickier unless:
If you’re giving a thumb’s up to any or all of the above, consider yourself a lucky rarity. For the rest of us, maintaining a neat home is on an-going feat. Chances are, you’ll find routine maintenance is easier than starting from scratch after chaos has reigned. Cleaning goes faster, stress levels stay lower (particularly when unexpected or even planned guests drop by), and most tasks are accomplished quicker when you can put your hands on things when you need them. We spend beaucoup bucks on our homes or apartments, so in turn, they should support us via:
How do you stay ahead or at least on top of the game? Here are some ideas.
1. Mind what comes in. Be diligent about what goes out.
No question, the less we have, the easier to maintain our spaces. Before making a new purchase, ensure it’s something that will add value to your existence. Adding value does include smiles and fulfillment, if done within moderation. The value increases if you’re willing to part with something already residing in your home to make room for the new. Keep in mind, before purchasing for others, if they’re trying to downsize or rightsize, additional purchases are like unfavorable calories that contribute to higher stress and renewed “weight gain” despite best intentions.
2. Gauging Your Comfort Zone
This sounds rudimentary, but it’s helpful to identify your tidiness barometer. How do you figure that out? What’s your comfort zone look or feel like?. Do you prefer uncluttered surfaces? Minimal décor? Or lots of your favorite things just about everywhere. Dust bunnies? They’re cute (achoo). We all have different levels of tolerance.
At what point do you start losing it? I need my home to be neat and clean. No crumbs on the counters or floors. I walk barefoot in the house. Crumbs underfoot drives me batty. Weekly dusting and vacuuming are built into my routines. And hygienic bathrooms. Definitely! Don’t feel compelled to copy me. That scenario may be well beyond what you desire or can reasonably accomplish. That’s ok. Imagine a spectrum from spic and span to messy/dirty. Where does your finger land? How about the others in your home? See if you can find a compromise state for the group. If someone’s cleanliness expectations are well beyond yours, perhaps you can get it to a point where they can pick up and carry the ball to their end zone. Split the difference.
Gauging your intrinsic barometer will guide you to maintain your sanity. These days that’s no easy ask. If you’re planning a day or week to lounge with the kids without guests on tap, then give yourself a “maintenance” pass if your calendar is already bursting. Drop one room from your weekly housekeeping or however often you clean. Then the next time, target that room first, and drop a different room. Rotating could save several minutes off your chore list.
Expecting guests? Your spouse’s boss coming for dinner may require a different set of standards than your friend who drops by on a weekly basis and has seen your house in various states of dishevelment. Modify your tasks to suit the context.
Don’t panic, just get to work in the main areas where guests will gather or use.
Focus on 3 triage areas—room to room pathways, living room (or wherever you entertain), common-use bathroom, & kitchen. If guests are staying overnight, then prepare the guest bedroom as well.
3. Tap into Your Support Network.

Rotate family fun with tidying breaks, then repeat. With everyone chipping in, it will go faster. Doing chores this way might more fun.
Call for reinforcements to speed up the process, keep you focused and accountable.
Ask your partner, if you have one, or friend for a hand. A less cranky you might be a welcome payoff. Assistance includes getting the kiddos out of your hair so you can focus without distractions. Ask if they’d be willing to run to the grocery store for dinner ingredients while you tackle home-side (or vice versa depending upon strengths and preferences).
Suggestion…gift your friend with a future lunch, coffee, or flowers (your honey might like that too).
During the day, take a few 17-31 minute breaks from family fun to address maintenance activities. Keep the length of time manageable to avoid overwhelm. Use odd times to make it interesting. To enhance buy-in, let the kids select the allotted time and target areas. Everyone straightens a room or you each tackle a section of a room. Then regroup for more playtime. Before bedtime, set aside 15-20 minutes again for kids to help clean up common spaces or their own rooms. With everyone chipping in, it will go faster. Doing chores this way might more palatable.
Requesting kids to lend a hand isn’t punishment. Actually it’s a gift. Simple tasks help them build skills, confidence, accountability, and independence. They’ll be on their own someday. The more tools they have to function, the better equipped they’ll be. Even tykes can handle age appropriate household chores removing some of the burden off your plate. Tie chore completion with a reward system. Use a chore chart like the one illustrated.
What are age appropriate chores for younger ones? Putting away toys or sports equipment. Sorting laundry, pulling clothes out of the dryer; folding clothes; placing shirts on hangers. Unloading child-safe plates, utensils, pots & pans from the dishwasher; Dusting (possibly vacuuming) their rooms and playrooms. Wiping counters and tables. These are all tasks that very young children can handle either with supervision or eventually solo. Age may be irrelevant as some kids are wise beyond their years, and others may need more time to mature into different tasks and complexities.
4. OHIO isn’t just a state (of mind)
The bottom line is to make life easier for yourself. Adjusting expectations to fit the circumstances will help with your sensibilities, and keeping on top of things by using techniques such as OHIO (only handle it once) will make better use of time. Put things away immediately after use. No time to run the item upstairs or down? Then place the item safely en route to its proper destination. The next time you head that direction, grab it and properly restow it.
Feel free to play around with methods to find what works well for you, not me, your friend, magazines, TikTok or anyone else. This is about managing your well-being and your spaces to accommodate your needs.
Best of luck mapping out your route to maintaining comfortable home.
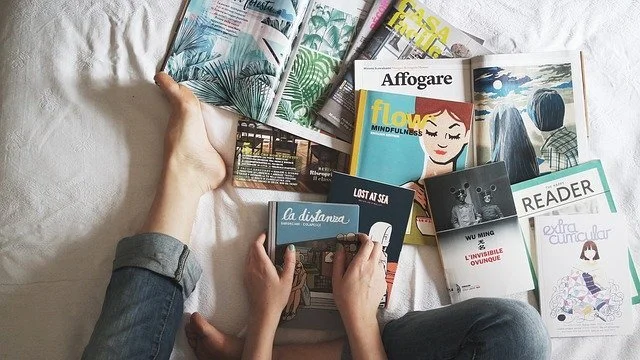
Making Sense of Book Organizing
This reprised and revamped tip appeared nearly 2 years ago, but the struggles with books continues. This week alone, nearly all of my clients were exasperated by their books.
Book lovers and casual readers, not surprisingly, have difficulty paring down and managing book collections. Organizing them in a way that allows you find the one you’re looking for rapidly, well, to say that’s a challenge for many of my clients, is an understatement . I’m offering up these suggestions to reduce undesirable clutter, see if it takes a pinch of stress away, and to help you manage reading material with greater ease.

Time to take control of your reading material? Start now. Image by rotkevichkonstantin from Pixabay.
My book collection was fairly minimal to begin with, most of which I donated within the last year. Occasionally, I pick up books at the airport as I prefer to have a book in hand rather than an e-reader. The Read and Return Program offered through Paradies booksellers was a fabulous option to off-load finished or uninteresting books. They offered 50% refund with a receipt. Full disclosure, I haven’t been able to verify if the program is still operational since covid, nor have I traveled much.
I’m fairly honest with myself about my reading habits. If I know that I’m not likely to read books, magazines, various articles at least within a reasonable time period, I ditch through donation or recycling as appropriate. If it comes down to decluttering vs wishful thinking and intentions, decluttering will win out every time in my world. Mostly my books come from the library. No worries about adding more clutter to my shelves. My husband is now an avid e-reader. He has been less amenable to paring down his massive book collection. In time, I presume.
How can you take control of unmanageable reading material that you hope to get to someday?
When any reading material arrives whether books from friends or family, magazines, news articles, or paper junk mail, make a judicious judgment. How likely will you read it? How important is it? How useful or enjoyable is the content? If you answer no or not so much to any of these, grab the recycling bin for paper articles or junk mail (if recyclable material) or donate the books to your local library or through Buy Nothing groups, or sell on Facebook marketplace or bookstores that specialize in pre-owned books. We’re fortunate that Powell’s bookstore in Portland, OR is a source for certain selections of pre-owned books and pays for those they accept. Payout varies depending upon demand and other variables.
Set a deadline for yourself to make decisions about whether to keep or release books. If you find that some books are hard to part with, put them in a simmer box. Stow away the simmer box for 3-6 months. Set am e-reminder to revisit them. See if you missed them. If not, allow someone else to enjoy them as much as you did.
Establish a place for reading material such as a magazine rack, attractive bin, or on a bookshelf. Once that fills, that’s the cue it’s time to pare down before adding anything new.
Use times such as enjoying a cup of tea or meals alone to sift through magazines or other pleasure reading. Make notes in your e-device or write in a journal the places you’d like to visit or recipes to make so that you have a central location to refer back. Include where you saw the original material in case you need to search back such as AAA Magazine-October 2021 edition or a book you wish to retrieve the next time you’re at the library. In fact, some library online programs allow you to store of a history of what you’ve already read and a wish list. Many libraries can order books through circulation programs so your next read will be available when you want it if it’s not already on their shelves.
Make judicious decisions about what you will actually read vs intentions. Then take action. Image by StockSnap from Pixabay
Be sure to shake out any books or magazines before you give away. Surprise! Checks, cash, greeting cards, and important documents have shown up in books during organizing projects with my clients. Phew, close calls. Also look for engravings, autographs, or special notes from loved ones. Those may be books to retain or remove the pages with sentimental notes for safekeeping.
Paper, magazines, and documents are much easier to manage once you’ve established a method and cleared out the piles. Label bins or shelf areas to keep track of what’s where if need be. Our fiction shelves are organized alphabetically. Non-fiction categorized by topic such as well-care, government/politics, history, biographies, etc. Can you tell I volunteered in libraries for over a decade???
Someday can begin today with a simple intention or plan to get started.
When the Housing Market Sizzle Freezes…Get Your House Sold Fast & Lucratively!
For home sellers, it’s been a spicy hot real estate market in Portland, Oregon. Houses sell themselves fetching countless offers, high above asking price. I’ve heard of uncommon perks such as sellers renting back for free for a month or two as terms of settlement conditions. Little to no home improvement is required to get seen, bought, and sold.
Buyers conversely haven’t been so lucky. Choices are:
A. Hunker down and wait until prices mellow out
B. Act rapidly and fork out well above comfort level in attempts to outbid
C. Give up the search entirely
Fortunately for buyers, sellers’ markets wax and wane, so don’t give up hope.
For sellers, how do you move a house quickly and for a lucrative price when the sizzle freezes? The smart course of action is preparing your home’s exterior and interior well before you list. Not sure how? A recent article, “60 Cleaning And Organisation Tips to Prepare Your Home for Sale” offers numerous strategic tips to create curbside and interior appeal. These recommendations are straight from the experts: home decorators, designers, organizers, and cleaners. We all know that cluttered, messy, dirty, or shabby environs are not great selling points likely to win over prospective buyers.
Whether you’re selling your home or simply wish to spiff up your living quarters, you’ll want to check out these recommendations.

Click on the image to learn what 60 experts have to say about getting houses sold quickly for high returns
The Practical Sort was honored to be among those selected to share strategic tips for home sellers here and in the United Kingdom where the article was published. Thanks to online publications, we can all benefit from this compendium of international knowledge.
Note the spelling of organisation is correct owing to the British audience despite what my spell checker thinks.

Samantha bench from Pottery Barn creates an excellently organized entry. Reprinted with permission from Pottery Barn.

Quickly find what you need while keeping surfaces clear by hanging keys, purses, and other grab & go items.
To create a welcome feeling for anyone entering your home including you, keep your entryway clutter-free.
No entry closet? Use hooks to hang coats, umbrellas, purses, backpacks, and keys.
Baskets provide aesthetically pleasing storage, and can tuck neatly away on shelves and in benches. Note the numbers on the baskets in the photo above as a means of identification. You can label as creatively as you wish for easy grab and go categorizing or tucking away.

Add a shoe cubby to organize pairs out of the way. Reasonably priced Made by Design available at Target.com.
Place a stylish bowl, cup, or tray on a table near the door to store cellphones, keys, & spare change. Locate the table near a wall outlet, if possible, to charge electronics.
A decorative recycling basket under the table is ideal for tossing junk mail. Don’t let it have a chance to procreate into unwanted piles. Hang a basket on the wall to hold bills until you have time to pay them.
Add a shoe cubby to neatly organize pairs out of the way.

A smartly decorated room with uncluttered surfaces is a welcome respite. Image from Pixabay.com
Clear out objects in your living room that do not add to the décor, comfort, or your lifestyle. Remove papers, books, and electronics from sofas and chairs so you have a place to relax.
Recycle old newspapers & magazines. Neatly arrange current publications on a coffee table or in a magazine rack. Only keep what you plan to read unless decorative. If you’re saving for someday, when will someday realistically come?
Carry finished library books to your car to return on your next trip out. Donate or sell purchased books so someone else can enjoy them.
Return toys to the playroom or place in covered baskets or bins.

Elfa pullout drawers for convenient access without bathroom gymnastics to reach in deep cabinet recesses

Clear countertops of extraneous items, locate towel bars on cabinet sides or adjacent walls, and create extra storage with recessed shelving.
Here’s my favorite bathroom tip. To avoid embarrassment, keep an extra toilet paper roll or 2 near the toilet. No vanity? Use a decorative basket or floating shelves within reach. Store additional rolls in a linen closet or under the sink. Emergency supply toilet paper and tissues can also be tucked away in a basement or garage if well sealed.
Stash a small trash bin for sanitary supplies behind the toilet. If there’s scant room, look beyond traditional waste bins for a slim receptacle that can fit between the toilet and the wall to tuck alongside the toilet brush.
Use command hooks on cabinet doors for appliances such as blowdryers. Under the sink pull-out drawers are handy for hygiene and household cleaning products, and paper goods. Pullout drawers are excellent options for easy access without performing gymnastic contortions to reach deep within cabinetry.
Countertops and shower stalls are collection areas for a host of hygiene and beauty products. Keep frequently used products within easy reach, the rest stow out of sight in drawers, baskets, and medicine cabinets.
Drawer dividers for makeup and small toiletries increase visibility enabling quick grab and go.
For tiny bathrooms and many users, consider personal totes for shampoos, conditioners, haircare, deodorants, and fragrances. Store totes in bedrooms or hall closets. Hallway shelves near the bathroom featuring decorative baskets can also serve as storage for personal care items or use decorative hooks to hang the baskets.
Place towel racks or bars on cabinet sides or adjacent walls. Towel racks or hooks on the back of bedroom doors hold towels and wash cloths if the bathroom walls are tapped out. Use command hooks on cabinet doors for appliances such as blowdryers.
Swivel arm towel bars are excellent space savers for hanging multiple towels when wall space is at a premium.
Pare down on extraneous items in the bathroom like old makeup, unwanted fragrances, solidified shaving creams and lotions, and unneeded medicines. Store nearly empty shampoo and conditioner bottles upside down in plastic containers to dispense every drop, then reuse or recycle empty bottles. Check with local donation centers particularly emergency shelters for items like fragrances, personal hygiene items, and unused cosmetics. Sealed but unboxed feminine hygiene products are desperately needed and accepted at women’s shelters and outreach donation programs. Check for acceptable items and donation protocols before heading out.
Dispose unneeded medicines at your local pharmacy if they have a take-back program. Or check with the police department for secured disposal bins or municipal waste programs for prescription, non-prescription, inhaler, and medical patch disposal options. Watch for National Take Back Day events every October and April sponsored by the Drug Enforcement Administration (DEA) for prescription drug disposal. Takebackday.dea.gov features a list of collection sites for controlled substances nationwide on event day and year round. Remove all personal information labels before disposing prescription bottles to protect your privacy. If no alternatives exist for medicine disposal, mix the medicine with kitty litter, old coffee grinds, sand, or dirt to make consumption less appealing. Then place the contents in a lidded plastic container or sealable bag, and toss in the trash.
If considering a bathroom remodel, camouflage colors or patterns hide hair, dust, and dirt. Your bathroom will look cleaner than it is if you have no time to clean or if guests drop by unexpectedly.
Recessed wall shelves expand storage spaces in the shower for personal care products and in the room itself without eating into room flow.

Preserve your bedroom as a haven for tranquility, sleep, and personal rejuvenation.

Tuck away items in an easy-to-reach bedside basket
Preserve your bedroom as a haven for tranquility, sleep, and personal rejuvenation. Limit electronics and anything that will not enhance relaxation.
A small bookshelf, night table, or baskets are perfect for storing bedtime reading, tissues, eyeglasses, aromatherapies, or any personal items that you wish to keep near your bedside.
Keep clothes neatly stowed in dressers, wardrobes or closets. If your clothes are hung on open rods, consider adding a curtain or partition if you find them distracting. Release all clothes that are tattered, torn, irreparable, non-fitting, or don’t mesh with your style.
Use photos of shoes on shoeboxes as labels to avoid useless searches or use shoe racks if you prefer, although the shoes are apt to get dusty.
Consider using under bed storage bins for stowing off-season clothes, accessories, extra linens, and emergency prep “Go Bags”.
Add a few decorative touches and relegate the rest to another room, donate, recycle or dispose.
Laundry Area Decluttering
Note, unlike the other decluttering categories, I didn’t entitle this tip as a room because not everyone has a laundry room. The laundry area may be a nook in the kitchen like in my last home or embedded in a powder room. If you live in an apartment, you may not have the luxury of in-home laundering facilities. But here’s what we all have in common…dirty clothes and presumably clean clothes. Establishing methods to keep the piles at bay and maintaining a degree of order in any dedicated laundry spaces you have will make the process go faster. Don’t believe me? Have someone hide the detergent, and see how that slows you down. Keep everything within easy reach and neatly stored to blow through the process with ease.
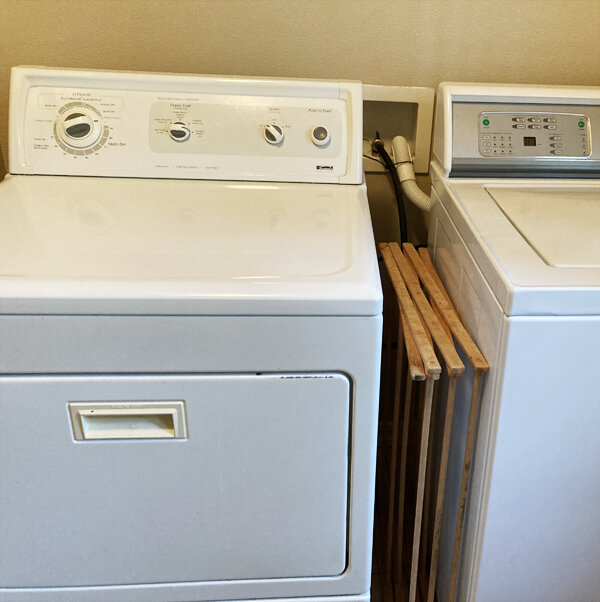
Stow drying racks between the machines

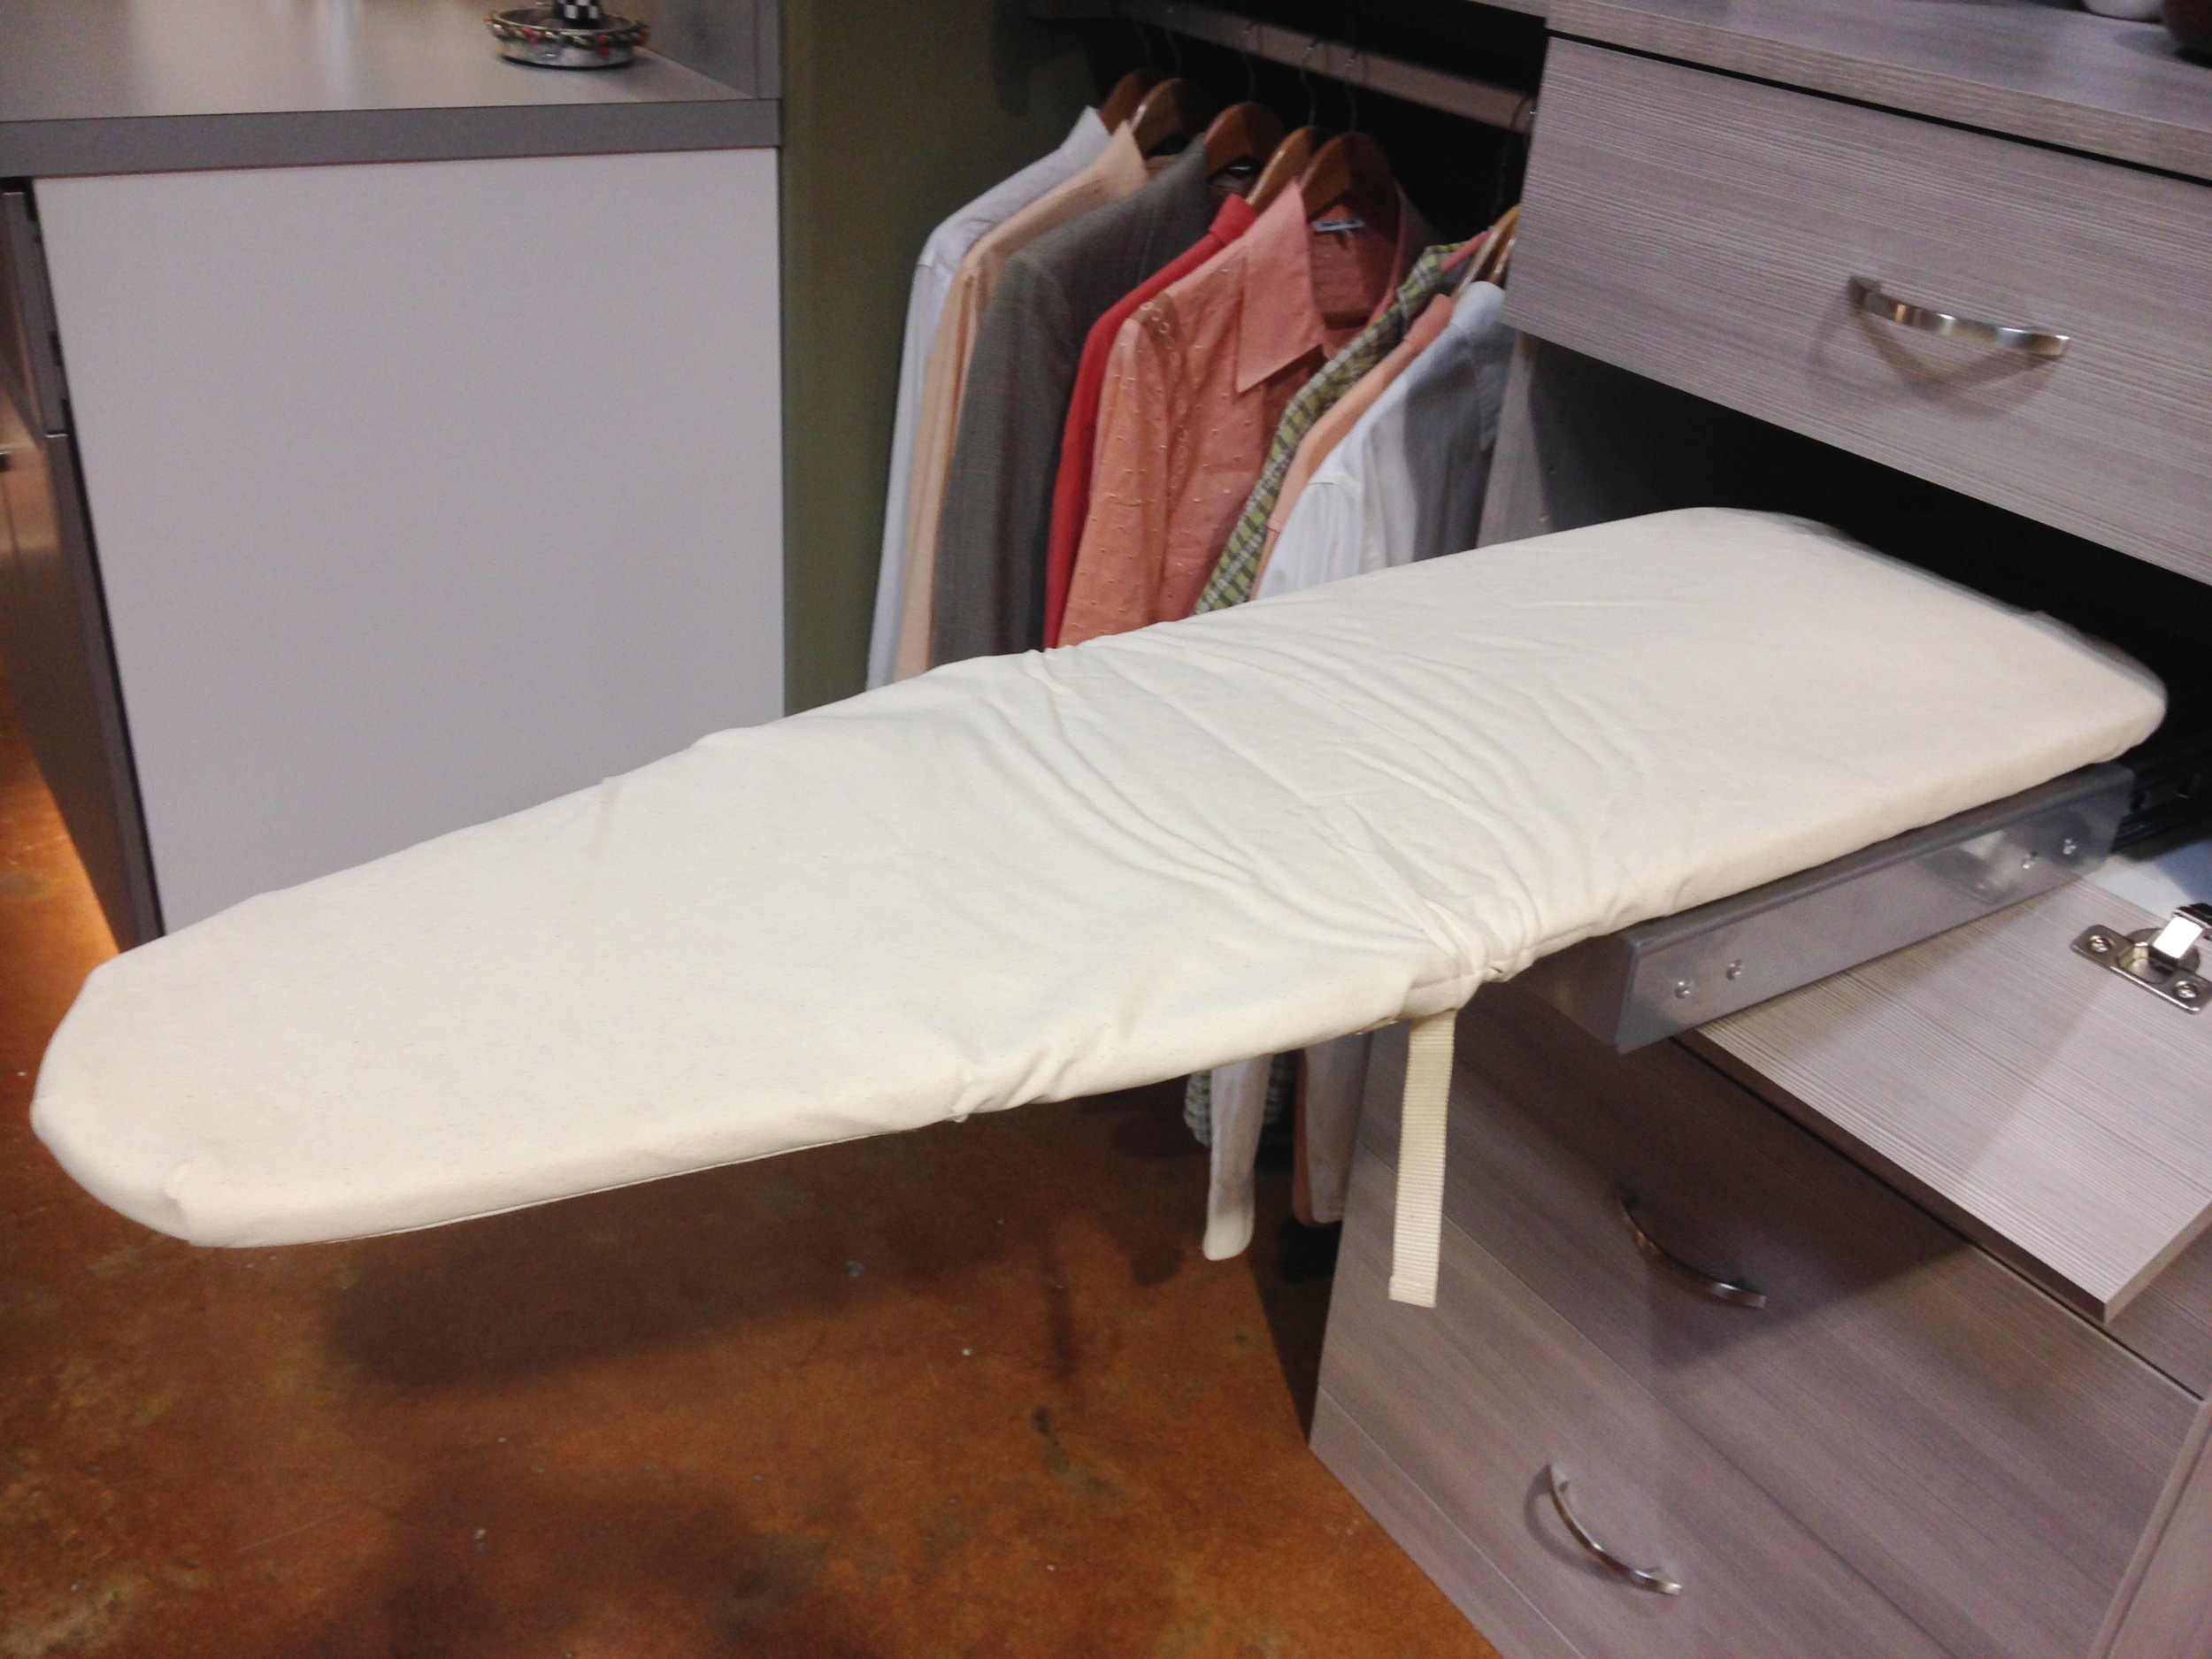
In tight spaces, tuck the ironing board away then slide it out when needed
Consider the areas between side by side machines for drying racks. Stash the ironing board between a machine and the wall. Or use wall space or an over the door hanger system to hold your iron and ironing board. Be certain the mountings are secure.
For a more upscale tight space option, install a drawer with a sliding ironing board. Slide it out when needed, then hide it away again. Allow the iron to fully cool down before you stow it away.
For a full-fledged laundry room with lots of storage and counterspace, make the most of it. Stash away household goods like extra tp, tissues, and detergents. I keep gardening supplies in the laundry room for quick access before heading to the backyard. If storage is at a premium, try to limit the room to laundering supplies to prevent overwhelm and crowding.

Optimize space. Slide ironing board between the dryer and wall

Add a rod, shelves, and baskets to increase storage. Hang clothes immediately as you grab them from the dryer or fold them for drawer stowage. Piles breed more piles. Avoid them like the pandemic!
Baskets and bins are decorative options for keeping frequently used items neatly stored out of sight. To keep potentially hazardous products out of reach of young children and pets, place bins on shelves up high. Use walls behind or next to the machines for small shelves for detergents, stain remover, and the iron.
If you tend to accumulate dirty clothing piles in or outside of your laundry room, grab some decorative baskets to house the clothes until they’re ready for the washer. No more tripping hazards or unsightly messes. The piles will be contained. If you can fit a few baskets, sort by color or however your washing process works so that you can simply toss each segment into the machine and get on to the next thing. The taller and thinner the bins the better to fit more baskets in small locations.
Place labeled clean clothing bins within reach of youngsters so that they can take their namesake bins to their rooms to put their clothes away. Small tasks teach big life lessons.
To avoid clean clothes piles after drying, keep extra hangers nearby. As you pull clothes out of the dryer that need hanging, immediately put them on a hanger. Piles breed more piles. Avoid them like the pandemic! If possible erect a hanging rod on the wall, use a portable rod, or worst case, hang a few shirts and pants at a time on a door knob. When that fills, put those clothes away and begin again. When getting dressed, take the hanger and place it toward one end of the closet rod until you have a bundle of empty hangers. On laundry day, grab the hangers. Or, I place my hangers on the bathroom doorknob when getting dressed so I remember to take them to the laundry room each day. They’re always available on the laundry rod when I need them.
Use the back of doors to hang storage pockets for detergent refills, stain removers, fine linen bags, rags, and other small items. Note the metal hanger can damage door frames, so be cautious.

Use laundry baskets, bins, or other types of receptacles for toting folded clean items. To avoid wrinkles and more piles, put clean clothes away as soon as laundering ends. If that doesn’t fit your schedule, each time you take a break from your desk or other activities, start a new load or put away a manageable size grouping. It’ll only take a few minutes. You’ll get your body moving. You’ll have more space to maneuver and feel better with less clutter.

Use the back of doors to hang storage pockets for detergent refills, stain removers, rags, and other small items.
Office Decluttering
Are you still based at home during the workday? With the rising number of vaccinated citizens, more and more employers are inviting employees back into the office. Some of us are staying put, and our home office need to work for us. A year and a half into the pandemic, what’s your home office like?
Did you…
Renovate?
Rearrange?
Organize or reorganize?
Let it go to hell?
Any organizing changes stick?
Often once a new system is in place and you give it a real go before giving up, maintaining the spaces is so much easier. That is until life happens. If you’ve been wanting to get your office under control or need to retame it, here are some quick ideas. Grab a cool drink, a bite to eat, then let’s get started.
While you’re sipping and chowing take a moment or two to think about what you want this room to be. Has it become a dumping ground for all things personal and professional? I get it, you may not have a lot of choice if storage is scarce or non-existent. But if you have space and want it to be a professional sanctuary that nurtures your creative and productive side, then it may be time to remove most or all the items that don’t fit the bill. Target things that distract your attention or inhibit workflow like paper piles, toys, dirty dishes.
Grab a few boxes and a marker for labeling. Walk around the office. Grab anything that doesn’t belong and place in a box. Don’t fret about sorting the items quite yet, just round them up. When the box is filled, put it in the corner or just outside the office area. Then when you have more time and energy begin the sorting. Think about will the items work better in other rooms, go to a donation center or resale, get tossed into the recycling bin, or the trash can? Place them in appropriate boxes for their destinations. You can do the same with paper piles to contain them until you are ready to tackle them.
Place your desk in a direction that will enhance not inhibit work
3. Speaking of attention distractions, ensure your desk is facing a direction that will not cause you to daydream or make you feel like you’re locked in a cage. Are you into or open to Feng Shui to achieve balance and flow of energy? Here are some Feng Shui principles for desk placement. This site also offers alternatives if ideal repositioning is not possible. And, listen to your gut. My desk faces a window, a Feng Shui no-no. I’ve played around with other arrangements, but flow was hampered. I also love turning to nature for recentering when my thoughts are wily.
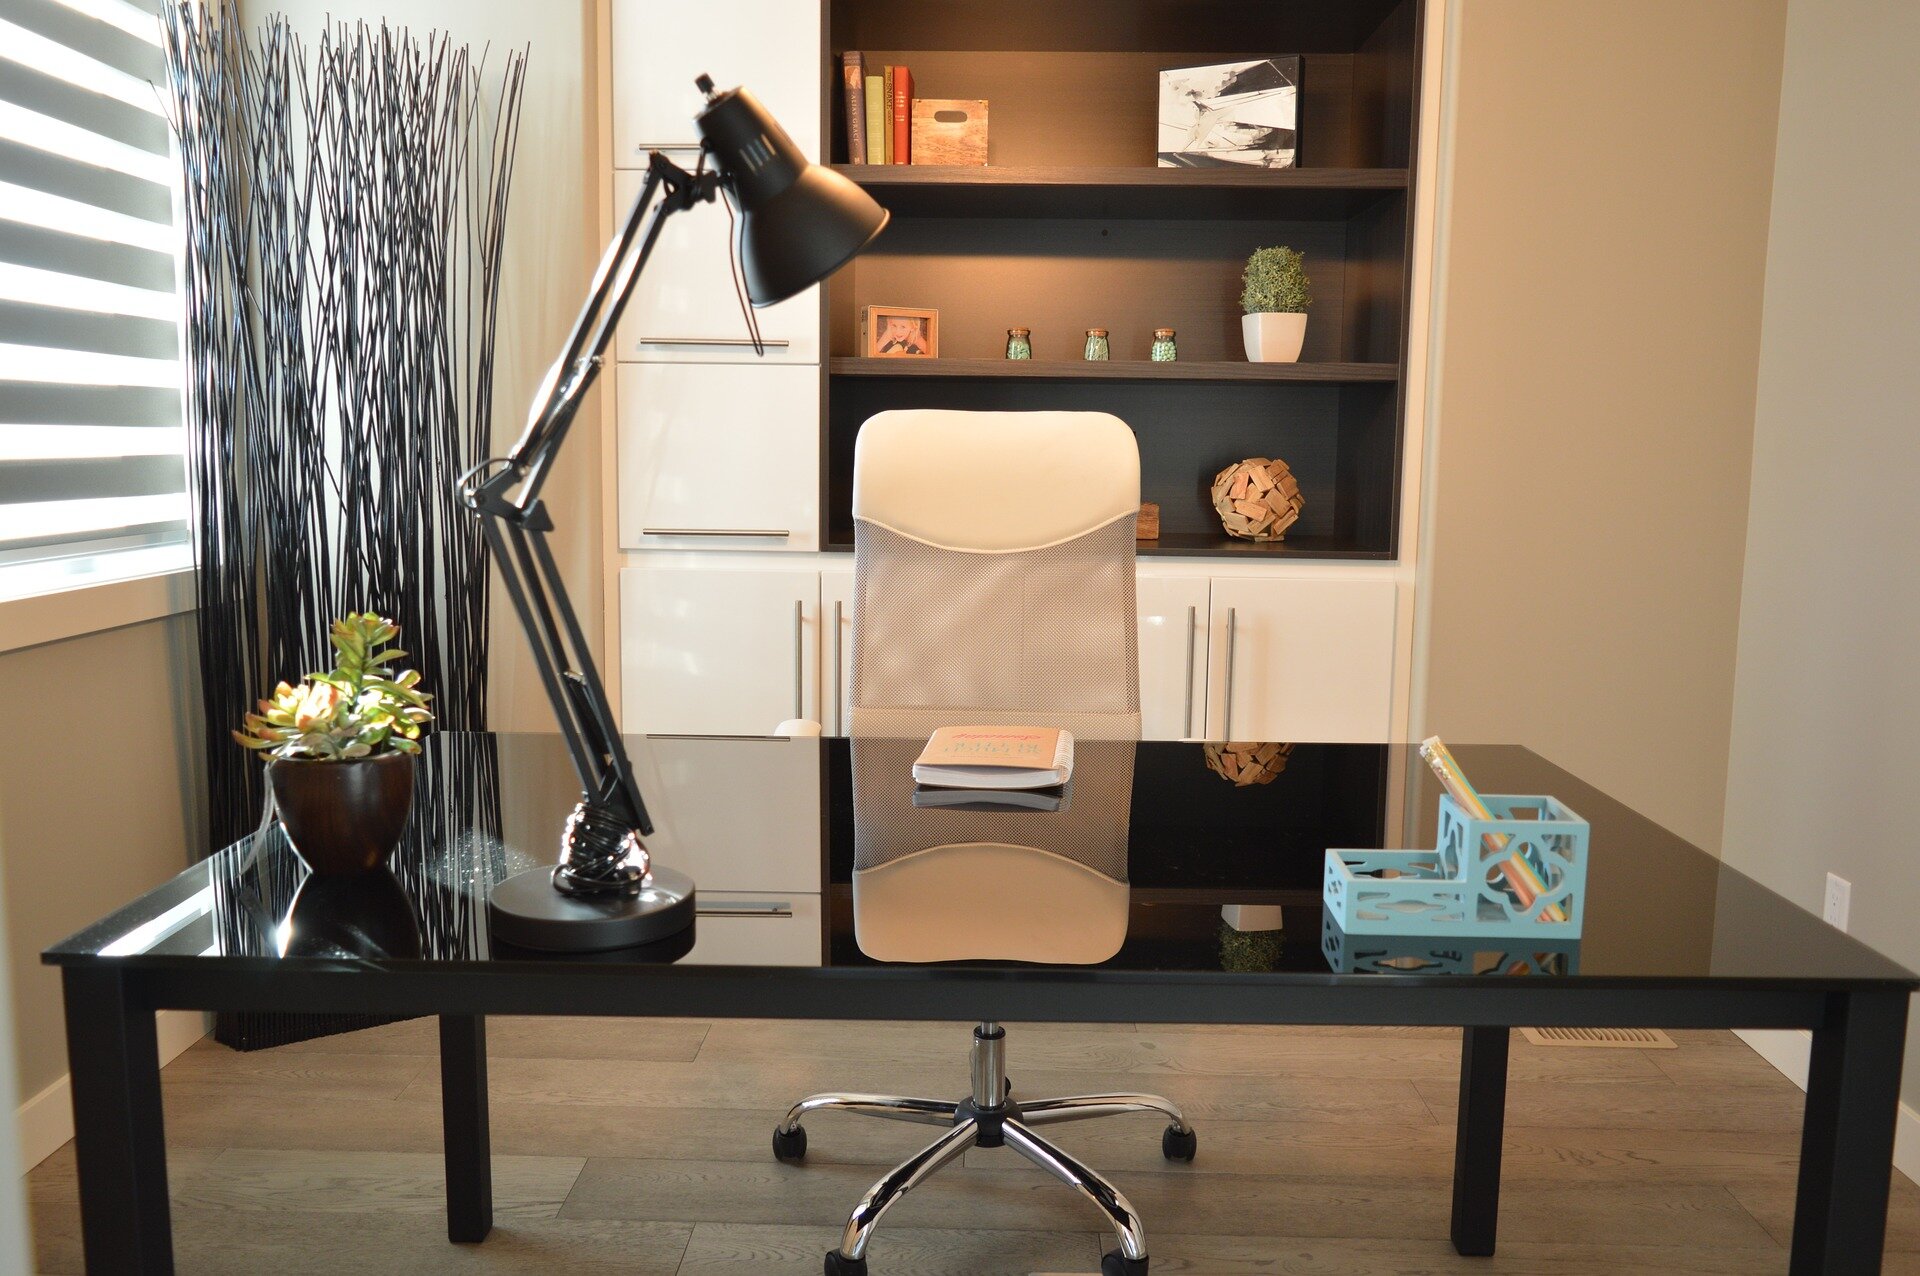
4. Locate frequently used office supplies within easy reach or alternatively, further away as an excuse to move off your chair periodically. Be as inventive as you wish to ideate storage. Repurposing what you have saves money and puts idle stuff to work.
For each category below, here are some suggestions to spur ideas.
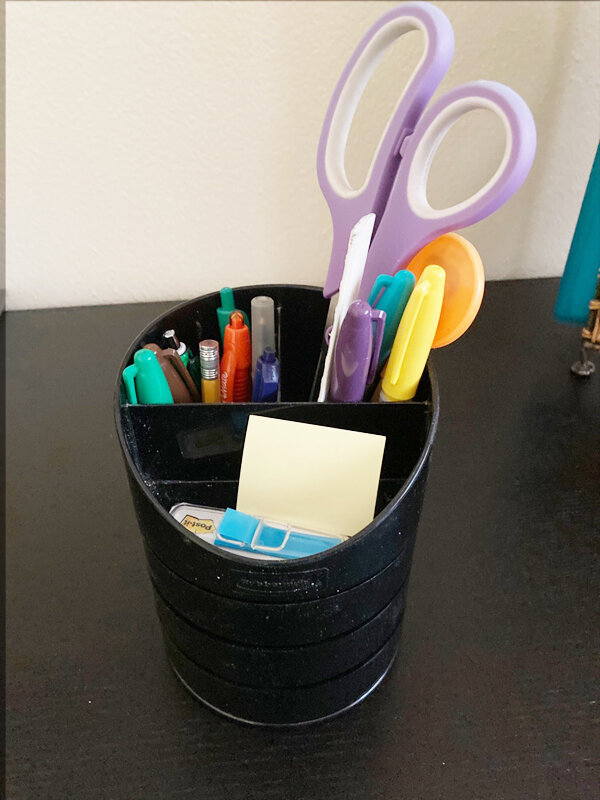
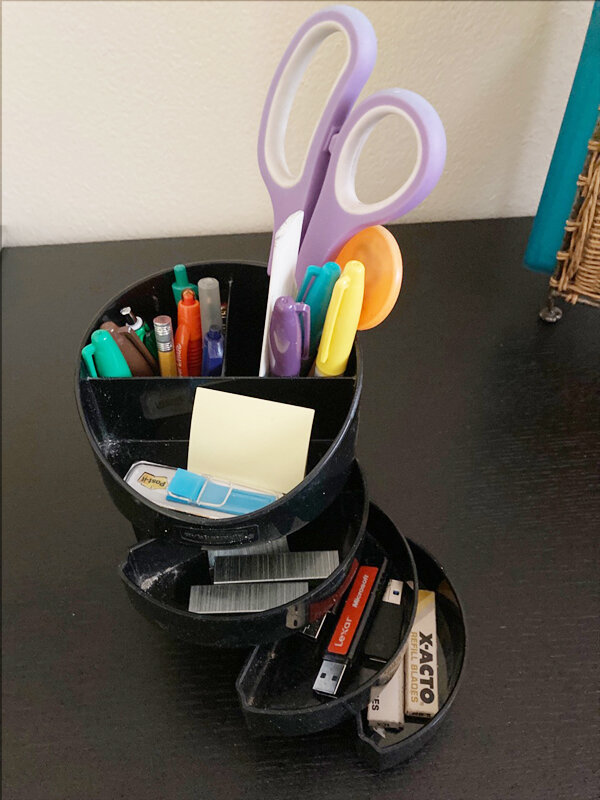
Writing implements, scissors, staplers
Use old jars, pottery, or fun containers
Desktop organizers (see photos below) can combine assorted supplies such as pens, markers, scissors, staples, thumb drives, clips, loose change, post-it notes and flags, and other small gadgets.
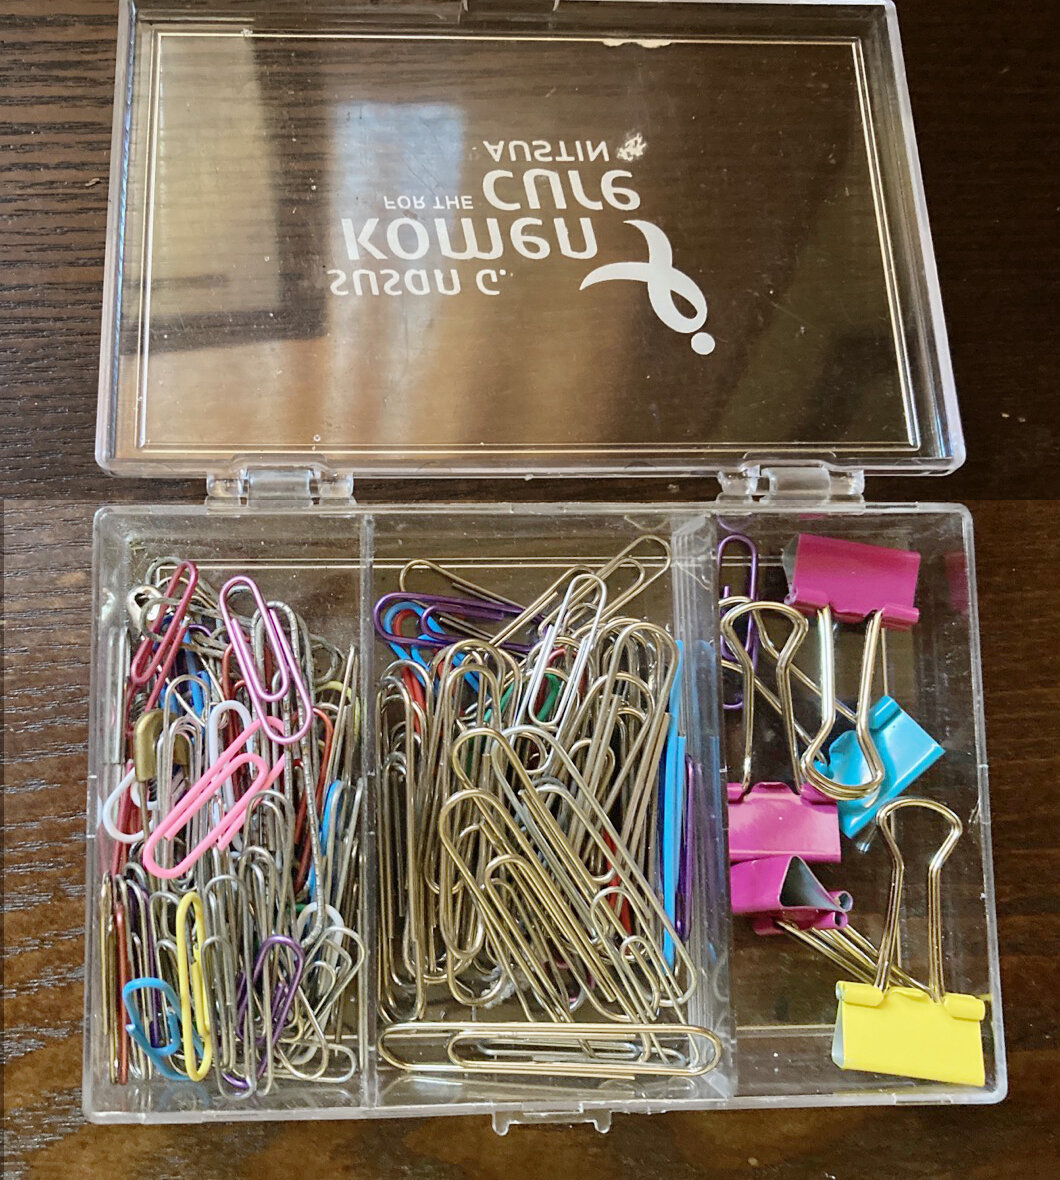
Paper and binder clips
Divided dispensers, cell phone boxes
Staples
Plastic food containers

Store new printer cartridges in an old cell phone box
Cell phone boxes can hold printer cartridges. Don’t forget to label the box so you remember the contents. Store the boxed cartridges near the printer.
Sort papers by categories (whatever makes sense to you) so that you can find what you need easily. Put the papers in boxes, bins, filing cabinets, or portable carriers. Keep important papers nearby in horizontal or vertical organizers.

Decorate walls with favorite photos or paintings to inspire or soothe
4. Decorate walls with simplicity. Select favorite photos or paintings that inspire you to plug away or soothe the inner beast during contentious calls.

Wayfair Naomi Bookcase (click on image for link)
5. Create your private niche within multi-person/multi-purpose rooms with curtains or partitions. Chaos can flourish beyond your space, keep peace within. Select partitions with built-in storage to tuck away office extras.
Garage, Attic & Basement Decluttering
Garages, attics, and basements, to be perfectly transparent, are not my favorite areas to organize. They’re dirty, dusty, cold, hot, cramped, buggy, dark, and sometimes vermin infested. They’re also some of the most cluttered areas desperately screaming for TLC.
So where do you begin when these repositories are overflowing with tools, hardware, garden equipment, indoor and outdoor gear, tires, window screens, old appliances, and other peoples’ furniture? Wherever you want and can safely access.
Here are some vital safety and comfort tips before you set to work to get you in the right frame of mind and keep you going longer.
1. Select a season and day when the temperatures aren’t dangerously or uncomfortably hot or cold unless you have no choice such as with a move or estate clear out. It’s also helpful to start organizing projects after waste collection days so that the disposal bins are empty.
2. Wear comfortable clothing. Dress for the temperatures. Eat and hydrate so you’re fully resourced with energy and stamina.
3. Keep water bottles, damp rags, or misters nearby if you’re working on a stifling day or space.
4. Use gloves, and yes, a mask to avoid inhaling too much dust or rodent droppings, and possibly goggles if the area is dangerously infested. Keep a plastic bag handy to put your shoes in when you’re done and possibly your clothing too if they get gross. Take them directly to the laundry room when finished for washing and shoe sanitizing.
5. Grab protective shoes as nails or other sharps may be on the floor and to protect your tootsies in the event objects tumble off shelves. Knee pads are advantageous for long periods of kneeling or low benches.
6. Back braces are also helpful if your back needs extra support.
7. Find furniture sliders and/or dollies to move large objects without wheels.
Now it’s time to dig in. Walk around until you find an area that feels like you can manageably make a dent within the time you have.
Start small. If you’re working on shelves, gently lift items off top shelves with an eye on safety if you have to use a ladder or step stool and lower heavy objects. Reach out to someone else for an extra hand. Injuries can set you back weeks or even longer. In fact, if you’re a social butterfly, the project will be more fun with a buddy if there’s room for you both to maneuver. Pump up some tunes if you need a burst of energy (as long as the neighbors and other household members don’t mind).
Set up a sorting table, provided there’s room, so you don’t have to keep bending and lifting. On a nice day, move the table outside the garage door or into a hallway so that you can manage more freely. Labeled sorting boxes and bins mimic those you have likely been using in other decluttering projects: relocate, donate, sell, recycle, trash. Use only 1-2 boxes if space is limited and do the sorting at a later time. Stackable boxes with lids are best as you’re likely not to finish immediately. If possible, clear out one corner to use as stacking central. However, don’t just stack and leave them for another decade. Set a date on your calendar to continue if you don’t finish the same day.
Chip away area by area until you run out of time, space, or boxes. Take notice of items in the donation box. Research options for donation centers. It’s a time waster to presume that they will gladly accept what you have. Verify acceptable items, operation hours, current locations, and protocols. If you plan to sell, take photos and begin the process as soon as you have time to price and offer the goods on a site that you feel safe to do so. Conduct the sale transaction in a location where it safely makes sense to do so. Inviting strangers to your home can be risky business.
If you’re dealing with lots of antiques, furniture, camping equipment, tools and garden equipment, reach out to an estate sale company for a consult or consignment shop. Opting for consignment or donation centers with pickup services will save you time, hassles, and potentially injury. Some are free, others charge a fee so be sure to ask. The fee might be worth it if it clears your space sooner allowing you to get on with other things.

When it’s time to put things away, lidded, labeled clear bins are ideal for storage. Carefully stack to maximize storage space. Try to categorize for easy retrieval such as grouping holiday ornaments, children’s hand-me-down clothes, emergency prep gear in segmented areas. This will save you endless searching later on.
Use vertical space for hanging tools and anything else that is hangable. Garage pegboards are ideal.

Cluttered closets are no fun
Does your clothes closet make you cry? That’s not a fun way to start a day.
Closets that are a mess, hold too many clothing and accessory choices, offer no choices that fit your body or style, or are design nightmares cause stress. Here are a few ways to modify a disturbing clothes closet aside from a structural renovation. Don’t let me discourage you from that route if your budget, time, and design abilities afford you the option. I have to say a redesign flipped my feelings from despising to desiring that little nook. I love my closet!
To begin decluttering your clothes and accessory closet…
1. Start with a clean slate. Select a day and time when you’ll have the calendar and mental space to work on this project. Linen closets can take hours, clothes closets can take a half day to several days depending upon volume, your physicality, distractibility, and decision-making prowess.
Before beginning, grab a marker for labeling and some boxes, bins, and even spare clothing racks if you have them. Then empty as much of the closet as you can. Keep in mind, clothes that have been hanging around unworn for long periods of time might be uber dusty, so tossing them on the bed isn’t advisable particularly if you suffer from dust allergies. Machine wash (follow manufacturer’s laundering instructions) clothes with a noticeable coating of dust before rehanging, donating or selling. The same goes for accessories. Gently wipe down shoes, belts, costume jewelry.
Once rods and shelves are cleared out, dust or use a damp cloth to remove buildup. To avoid causing an allergy attack inducing dust cloud, use the vacuum duster attachment to suck up a thick coating of dust and crumbs from shelves. Vacuum the floor dust bunnies once the floor is clear. Damp mop hard floor surfaces for a deeper cleaning. Be sure to get in all the nooks and crannies.
2. Set a goal. Do you want to be able to see what you have? Would you prefer designated sections to help you zero in on sweaters, jackets, belts, and purses faster? Do you want to feel less overwhelmed each time you walk in or slide the doors open? What will it take to make that icky feeling go away? Less stuff might make you feel more calm and help you arrive at decisions quicker. So before you put everything back in…
3. Take stock. Once everything is out of the closet, this is your chance to evaluate what you have, piece by piece. You’ll be surprised at the number of items you’ve forgotten reside in that crammed space. Since the last time you reorganized your closet, if ever, your weight may have fluctuated (up or down), your style preferences may have shifted, your needs may have changed (do you still require a professional wardrobe?).
Allow yourself the grace to release apparel or accessories that are:
Tattered or stained beyond repair
Unflattering to your figure or style preferences
Itchy or feel awkward
Perpetually unworn (even if you broke the bank to purchase it and the guilt weighs on you). Sitting idly taking up space doesn’t allow it to earn its keep. Passing it on to someone else who will treasure it might alleviate the guilt.
4. Decision time. For all the pieces you’re ready to eject, it’s time to sort for destination.
Gift. Has your bestie ever mentioned that she’d love that sweater should you get rid of it? Surprise her with a gift and a message to let her know how much you appreciate giving the sweater a new loving home and body to put it to use.
Donate. Do you have a favorite non-profit? Check to see their list of accepted items, hours of operation, and current protocols. If they have pickup services, that will save you time. Note if there is a fee.

Minimize keeping the clothes and accessories you love. Store them in a way that makes sense to you.
Consign. Are the articles consignment worthy? Consignment shops range from luxury labels to everyday wear, find one near you that meets the inventory criteria. Research sale price percentages and terms before signing agreements.
Sell. Estate sales could be the way to go if you have a large volume of sellable goods in satisfactory condition. Click here for must read tips before engaging a managed estate sale company.
Online market places are another way to go if you have the time to photograph, describe, and price your sale items. It’s time consuming. NAPO Oregon’s new Business Partner Sella makes selling safe and easy for a flat fee by listing your premium condition clothes, shoes and accessories (valued at over $40/each) along with many other household items including furniture, electronics, sports gear on multiple marketplaces and doing all the legwork while you collect the profit.
5. Keepers. Now it’s time to put all the cleaned items back into your closet in a way that will make sense for you to quickly see and access what you want. If the only items in there are things you like, then decisions will go faster in the morning.
If a complete overhaul is on the horizon, NAPO Oregon Business Partner California Closets can help you create a design for your personal organizing and storage needs.
Craft Room Decluttering
Craft rooms are fun. Unleash your creative genius and go absolutely wild reveling in your hobby of choice. Crafty spaces can also get messy quickly. Searches through unruly piles wastes time and takes you away from the activity that brings you joy. Out of control inventory leads to duplicate purchases, overspending, and storage nightmares. Who needs 6 identical red ribbon spools because 5 were scattered and buried? To avoid a supply landfill, here are some suggestions to stay on top of what you have so you can lay your hands on the object you need asap.
1. Find a time to clean up and clear out. Focus only on decluttering in lieu of working on your hobby. Otherwise you will feel rushed and discouraged. Set to work on straightening and reducing unneeded or unwanted goods while keeping in mind that in the end you’ll be able to focus on the crafting with greater ease.
2. Like all organizing projects, ensure that you’re fully resourced. Don’t even go there if you’re hungry, thirsty, overly tired, or in a poor frame of mind unless being in the midst of the supplies feeds your soul with energy reversing goodness.
3. Clear out enough space to use as a staging area. Then grab some boxes/bins and markers for labeling.

Begin with a manageable area, pull all those items out, and begin the sort, keep, and purge process.

4. Choose an area to begin. If your free time is limited and space is tight, then contain the project to a manageable size to avoid more clutter and safety hazards when you have to wrap up. Each time you have a chunk of spare time, repeat this process. Set alerts if you’re prone to losing yourself in projects so that you don’t lose track of time, appointments, or other obligations.
5. Analyze what is working and what isn’t for storage, flow, and aesthetics. If some areas are fine, then perhaps leave well enough alone. Focus on the areas that drive you crazy or prevent you from accomplishing your project goals efficiently.
6. Once you’ve chosen an area to tackle, begin pulling out all the items. You’ll end up with a mess of stuff. Take some deep breaths if needed because here comes the hardest part…deciding if you’ll ever want or need what you’ve got.
Let’s make this as easy as possible. Begin with the definite keepers and tossers and sort into 2 boxes for now, subdivide later. Return the keeper box to the craft room if you’re sorting outside the area or to a corner of the room. Place the filled ‘toss’ box aside, begin a new set of boxes as needed. Carefully stack those destined for disposal until you’re ready to sort for their next destination. Anything that is clearly trash or curbside recyclable, ditch before you have second thoughts.

7. As you sort through the boxes, take a critical look at what no longer best serves your purposes. Do you have too many scrap pieces of paper that are too ratty to use? Maybe those scraps are in fine condition but no longer suit your tastes or needs and would serve someone else better. Here are some eco disposal resources for your no longer needed arts and crafts supplies. As I always recommend, call the facility before you grab your keys to head out the door to verify accepted items, hours of operation, location, and pandemic related protocols.
8. To arrange the keepers, sort the objects in a way that makes the most sense to you and your visual and kinesthetic preferences. Don’t be afraid to go with your first inclination you can always change your mind if you discover some other way that is more rational. You can begin by sorting by hobby if you have multiple hobbies. Or if your supplies intersect hobbies, you can sort by product: papers, writing implements, yarns, embellishments, photos, etc. Once you have general sorting done, then you can refine the sorting within your categories such as color, theme, patterns.
The goal is REDUCTION this includes extraneous expenditures as well as clutter. Your wallet will thank you. If you still need more storage options after paring down, you can economize by shopping garage sales, thrift stores, and neighborhood online marketplaces including Buy Nothing groups. If you have the time and inclination, you can dress up these storage purchases to enliven your space and satisfy visual druthers. If the containers or furnishings will be tucked away in closets, then there is less need for fanciful objects. More time savings means more time for your hobby.
Music Decluttering
Music energizes, it soothes, it heals, it inspires, it holds memories of our life story. Non-digital music also takes up space. If you’re in dire need of storage space, and you’ve cleared out as much as you can, there is one final place that might need some decluttering and downsizing consideration. Warning, this subject is serious taboo for some of you who would never consider getting rid of any music no matter how outdated (yes music can be outdated, think Partridge Family or The Bay City Rollers, sorry fans), unlistened to in the last ½ century, or even reviled. I get it, disposing of music is pure heresy for you. For the rest of us, let’s recover that storage space. If you’ve been seeking inspiration to start paring down those old 45s, 78s, LPs, cassette tapes, 8-tracks, and CDs, now’s the chance. So grab your music App, cue up your favorite tunes because here we go.

Choose a place to begin. Make it easy. If cassette tapes and 8-tracks are no brainers, get a box or bag, pile them in and set them aside for now. Truthfully, there may be no eco-friendly disposal methods for these eco-hazards. The tapes are laden with toxic chemicals and the rest is plastic that will live on for infinity. You may have recycling options in your area check with your waste hauler or do an internet search. If not, you can pack and ship to GreenDisk. Visit the link or contact them directly for current accepted items, pricing, and shipping details.
Next move on to a section of cds or albums (if you still have any). Start really small with perhaps 5-10 at a time. This is an ideal opportunity to relive favorite memories as you look at album covers or spin those tunes. Or notice your stomach churning, it may be a sign that some unhappy memories are behind the casing. Those need to go. Keep working away, manageable sections at a time until you run out of time, energy, will, or storage for those bound for disposal.
So what do you do with those you’re ready to ditch? Here are some ideas. I volunteered as an organizer at a local jazz radio station. Periodically we received a few or entire collections of CDs or vinyl albums which were parts of estates or downsizing clear outs. We culled through the collections noting usability conditions and format fit for the station, those were kept. The rest were donated.
For music you no longer wish to retain there are options, except perhaps opera. My father was an opera aficionado with an immense collection of opera vinyl and CDs. Clearing them out of his music library after he passed away was virtually impossible. I spent nearly a week making phone calls to radio stations, local music schools, used record stores, university music departments, libraries, senior centers, etc. No takers. His classical music nearly flew off the shelf, lots of interest for those. My mom wasn’t interested in advertising them for sale, absolutely out of the question. Fortunately, I finally found a radio station host willing to take them off our hands, mostly for his personal collection. I was so grateful that his prized and very expensive vinyl and cds were destined to a new home, perhaps giving others the pleasure he derived.
Be sure to keep copies on your hard drive, the Cloud or a cd of any music that you’re wishy washy about bagging and tagging to gain storage space. Remember, that’s the goal here.

CDs eat up a lot of shelf space. Keep the ones you love. The rest purge.
For the rest, check with genre-appropriate local radio stations or used music stores, music schools, university music departments, senior centers, fitness centers, day care centers, libraries, thrift stores, neighborhood exchange websites. You could advertise for sale the golden nuggets in good condition where there’s a market.
Finally, you could gift them to a friend or family members whose musical tastes are aligned with the artist or album. However, ensure that your former treasure doesn’t become someone else’s trash. That truly won’t be appreciated.

